Categories
spring-boot

no main manifest attribute, in – spring boot

In this post, we will learn to resolve no main manifest attribute, in – spring boot application

Once your jar is build using maven command, we will attempt to run the jar

This exception will occur if you didn’t add maven build plugin in your pom.xml file

Solution

Add below maven build plugin in your pom.xml

<plugin>
    <groupId>org.springframework.boot</groupId>
	<artifactId>spring-boot-maven-plugin</artifactId>
	<executions>
		<execution>
			<goals>
			<goal>repackage</goal>
			</goals>
	    </execution>
	</executions>
</plugin>

After adding above plugin in your pom.xml, Build your spring boot project using maven command mvn clean install

<?xml version="1.0" encoding="UTF-8"?>
<project xmlns="http://maven.apache.org/POM/4.0.0"
	xmlns:xsi="http://www.w3.org/2001/XMLSchema-instance"
	xsi:schemaLocation="http://maven.apache.org/POM/4.0.0 https://maven.apache.org/xsd/maven-4.0.0.xsd">
	<modelVersion>4.0.0</modelVersion>
	<parent>
		<groupId>org.springframework.boot</groupId>
		<artifactId>spring-boot-starter-parent</artifactId>
		<version>2.3.0.RELEASE</version>
		<relativePath /> <!-- lookup parent from repository -->
	</parent>
	<groupId>com.example</groupId>
	<artifactId>demo</artifactId>
	<version>0.0.1-SNAPSHOT</version>
	<name>demo</name>
	<description>Demo project for Spring Boot</description>

	<properties>
		<java.version>1.8</java.version>
	</properties>

	<dependencies>
		<dependency>
			<groupId>org.springframework.boot</groupId>
			<artifactId>spring-boot-starter-web</artifactId>
		</dependency>

		<dependency>
			<groupId>org.springframework.boot</groupId>
			<artifactId>spring-boot-starter-test</artifactId>
			<scope>test</scope>
			<exclusions>
				<exclusion>
					<groupId>org.junit.vintage</groupId>
					<artifactId>junit-vintage-engine</artifactId>
				</exclusion>
			</exclusions>
		</dependency>
	</dependencies>

	<build>
		<plugins>
			<plugin>
				<groupId>org.springframework.boot</groupId>
				<artifactId>spring-boot-maven-plugin</artifactId>
				<executions>
					<execution>
						<goals>
							<goal>repackage</goal>
						</goals>
					</execution>
				</executions>
			</plugin>
		</plugins>
	</build>
</project>

After adding maven build plugin, you can build and run your spring boot application successfully.

Categories
java spring-boot

configure datasource programmatically in spring boot

In this post, we will learn about configure datasource programmatically in spring boot

In below example we are using mysql as database. We are reading database properties from application.properties using @ConfigurationProperties

Using DataSourceBuilder
    @ConfigurationProperties(prefix = "datasource.custom")
	@Bean
	@Primary
	public DataSource dataSource() {
		return DataSourceBuilder.create().build();
	}

In the above snippet spring boot will create datasource with values from application.properties

datasource.custom.jdbcUrl=jdbc:mysql://localhost:3306/beginnersbug
datasource.custom.username=root
datasource.custom.password=password
datasource.custom.driverClassName=com.mysql.jdbc.Driver
spring.jpa.properties.hibernate.dialect = org.hibernate.dialect.MySQL5Dialect

make sure your prefix correct matching text. In this example I am using datasource.custom as prefix

CREATE TABLE students (
    id int NOT NULL,
	firstname varchar(255) NOT NULL,
    lastname varchar(255) NOT NULL,    
    department int,
    PRIMARY KEY (id)
);
dependency
<dependency>
			<groupId>org.springframework.boot</groupId>
			<artifactId>spring-boot-starter-data-jpa</artifactId>
		</dependency>
<dependency>
			<groupId>mysql</groupId>
			<artifactId>mysql-connector-java</artifactId>
			<scope>runtime</scope>
		</dependency>

Configuration Class

Your configuration class should annotated with @configuration

import javax.sql.DataSource;

import org.springframework.boot.context.properties.ConfigurationProperties;
import org.springframework.boot.jdbc.DataSourceBuilder;
import org.springframework.context.annotation.Bean;
import org.springframework.context.annotation.Configuration;
import org.springframework.context.annotation.Primary;

@Configuration
public class DatasourceConfig {

	@ConfigurationProperties(prefix = "datasource.custom")
	@Bean
	@Primary
	public DataSource dataSource() {
		return DataSourceBuilder.create().build();
	}

}

In this program we are connecting to mysql database. Below is DaoInterface where I am using JpaRepository for CRUD operations

import org.springframework.data.jpa.repository.JpaRepository;
import org.springframework.stereotype.Repository;

import com.beginnersbug.studentservice.model.Student;

@Repository
public interface StudentDao extends JpaRepository<Student, Long> {

}

From Controller class we are invoking DAO interface to retrieve strudents table data


import java.util.List;

import org.springframework.beans.factory.annotation.Autowired;
import org.springframework.web.bind.annotation.RequestMapping;
import org.springframework.web.bind.annotation.RequestMethod;
import org.springframework.web.bind.annotation.RestController;

import com.beginnersbug.datasource.StudentDao;
import com.beginnersbug.datasource.model.Student;

@RestController()
@RequestMapping("/api/student")
public class StudentController {

	@Autowired
	StudentDao studentsDao;

	@RequestMapping(method = RequestMethod.GET)
	public List<Student> getStudentsList() {
		return studentsDao.findAll();
	}

}
Testing

Hit http://localhost:8080/api/student from Chrome brower, It will return all the values from the students table

Github

https://github.com/rkumar9090/datasource

Related Articles

connect MySQL database from spring boot

Categories
java

com.sun.net.httpserver.httpexchange not found in eclipse

In this post we will learn about com.sun.net.httpserver.httpexchange not found in eclipse

While I am trying to add Http Server in Core java application I faced below exception

import com.sun.net.httpserver.Headers;
import com.sun.net.httpserver.HttpExchange;
import com.sun.net.httpserver.HttpHandler;
import com.sun.net.httpserver.HttpServer;

If you are not to able to add above dependencies in java code, please verify below points

  • You should use java version above 1.6
  • Make sure you have configured correct JDK in your build path

If above things are correct still you are facing the issue means you need to do below thing in eclipse

you need to add com/sun/net/httpserver/ package in the access rule

  • Open Eclipse
  • Navigate to java build path
  • Click on the access rule under JRE System Libray
  • Click on the edit button and add an access rule like below image
Reference

https://stackoverflow.com/questions/13155734/eclipse-cant-recognize-com-sun-net-httpserver-httpserver-package

Related Articles

add rest service in core java application

Categories
java

add rest service in core java application

In this post, we will learn about add rest service in core java application

We are in spring boot world, where exposing a http endpoint is much easier, but when it comes to a standalone java application we will get confused

Java has a feature to expose Http endpoint from a standalone application.
Using import com.sun.net.httpserver.HttpExchange;

In below example, we are exposing an Http endpoint on port number 8080 with endpoint /health

Example

import java.io.IOException;
import java.io.OutputStream;
import java.net.InetSocketAddress;

import com.sun.net.httpserver.HttpExchange;
import com.sun.net.httpserver.HttpHandler;
import com.sun.net.httpserver.HttpServer;

public class HttpServerExample {

	public static void main(String[] args) throws Exception {
		try {
			HttpServer server = HttpServer.create(new InetSocketAddress(8080), 0);
			server.createContext("/health", new Handler());
			server.setExecutor(null);
			server.start();
		} catch (Exception e) {
			e.printStackTrace();
		}

	}

	static class Handler implements HttpHandler {
		@Override
		public void handle(HttpExchange t) throws IOException {
			String response = "Up & Running";
			t.sendResponseHeaders(200, response.length());
			OutputStream os = t.getResponseBody();
			os.write(response.getBytes());
			os.close();
		}
	}
}
Output

http://localhost:8080/health

Up & Running

If you are not found com.net.sun.http package in your eclipse follow this URL https://beginnersbug.com/com-sun-net-httpserver-httpexchange-not-found-in-eclipse

Github

https://github.com/rkumar9090/BeginnersBug/blob/master/BegineersBug/src/com/geeks/example/HttpServerExample.java

Categories
collections java

convert iterator to list in java

In this tutorial, we will learn convert iterator to list in java

Here we are giving two approach to convert iterator to list in java

Syntax in Java 8
ArrayList<String> list = new ArrayList<String>();
iterator.forEachRemaining(list::add);
Syntax in Java 7
ArrayList<String> list = new ArrayList<String>();
while (iterator.hasNext()) {
  String string = (String) iterator.next();
  list.add(string);
}
Example
import java.util.ArrayList;
import java.util.Arrays;
import java.util.Iterator;

public class IteratorToList {

	public static void main(String[] args) {

		Iterator<String> iterator = Arrays.asList("Rajesh", "Kumar", "Beginners", "Bug").iterator();
		convertToListJava7(iterator);
		convertToListJava8(iterator);

	}

	/**
	 * Java 7 Approach
	 * 
	 * @param iterator
	 * @return
	 */
	public static ArrayList<String> convertToListJava7(Iterator<String> iterator) {
		ArrayList<String> list = new ArrayList<String>();
		while (iterator.hasNext()) {
			String string = (String) iterator.next();
			list.add(string);
		}

		return list;
	}

	/**
	 * Java 8 Apporach
	 * 
	 * @param iterator
	 * @return
	 */
	public static ArrayList<String> convertToListJava8(Iterator<String> iterator) {
		ArrayList<String> list = new ArrayList<String>();
		iterator.forEachRemaining(list::add);
		return list;
	}

}
Github

https://github.com/rkumar9090/BeginnersBug/blob/master/BegineersBug/src/com/geeks/example/list/IteratorToList.java

Related Articles

Iterate list using streams in java

Categories
spring-boot

add swagger in spring boot application

In this tutorial, we will learn to add swagger in spring boot application

What is Swagger ?

Swagger is an open-source software framework backed by a large ecosystem of tools that helps developers design, build, document, and consume RESTful web services.

How to add in Spring boot

It is easy to integrate with spring boot. with help of few dependencies and some configuration we can easily integrate with spring boot

Depedency
<dependency>
	<groupId>io.springfox</groupId>
	<artifactId>springfox-swagger2</artifactId>
	<version>2.6.1</version>	
</dependency>
<dependency>
	<groupId>io.springfox</groupId>
	<artifactId>springfox-swagger-ui</artifactId>
	<version>2.6.1</version>
</dependency>
Annotation
@EnableSwagger2
Bean
@Bean
	public Docket api() {
		return new Docket(DocumentationType.SWAGGER_2).select().apis(RequestHandlerSelectors.any())
				.paths(PathSelectors.any()).build();
	}
Main Class

import org.springframework.boot.SpringApplication;
import org.springframework.boot.autoconfigure.SpringBootApplication;
import org.springframework.context.annotation.Bean;

import springfox.documentation.builders.PathSelectors;
import springfox.documentation.builders.RequestHandlerSelectors;
import springfox.documentation.spi.DocumentationType;
import springfox.documentation.spring.web.plugins.Docket;
import springfox.documentation.swagger2.annotations.EnableSwagger2;

@SpringBootApplication
@EnableSwagger2
public class StudentServiceApplication {

	public static void main(String[] args) {
		SpringApplication.run(StudentServiceApplication.class, args);
	}

	@Bean
	public Docket api() {
		return new Docket(DocumentationType.SWAGGER_2).select().apis(RequestHandlerSelectors.any())
				.paths(PathSelectors.any()).build();
	}
}

Time needed: 10 minutes

Steps

  1. dependency in pom.xml

    add above dependency in pom.xml

  2. Annotation in Configuration file

    add above annotation in a configuration file

  3. Bean method

    add above bean

  4. Testing

    Open http://localhost:8080/swagger-ui.html in browserswagger

Conclusion

With the help of two dependencies and one bean method we can easily add swagger in spring boot application

Related Articles

crud operations in spring boot with Mysql

Categories
spring-boot

Field ‘id’ doesn’t have a default value

Field ‘id’ doesn’t have a default value: You will face this exception when you not properly configured your model class or table

Exception
java.sql.SQLException: Field ‘id’ doesn’t have a default value
Solution
  • Make sure your table has a primary key and Auto_Increment property
  • In the case of Oracle database, your table should have Sequence
  • Your model class should have below properties
	@Id
	@GeneratedValue(strategy = GenerationType.IDENTITY)
	private Long id;

To learn more about Spring boot database operations use this link
https://beginnersbug.com/crud-operations-in-spring-boot-with-mysql/

References

https://stackoverflow.com/questions/804514/hibernate-field-id-doesnt-have-a-default-value

Categories
microservices spring-boot

crud operations in spring boot with Mysql

In this tutorial, we will learn crud operations in spring boot with Mysql

If you want to learn more about connecting MySQL from spring boot, please follow this link https://beginnersbug.com/connect-mysql-database-from-spring-boot/

What you’ll learn

End of this tutorial, you will learn crud operations in spring boot with Mysql

Save syntax
// Here studentsDao is the repository interface
studentsDao.save(entity);
Select all syntax
// Here studentsDao is the repository interface
studentsDao.findAll();
Select by id syntax
// Here studentsDao is the repository interface
studentsDao.findById(id);
Delete all syntax
// Here studentsDao is the repository interface
studentsDao.deleteAll();		
Delete by id syntax
// Here studentsDao is the repository interface
studentsDao.deleteById(id);
Database Scripts
CREATE TABLE students (
    id int NOT NULL,
	firstname varchar(255) NOT NULL,
    lastname varchar(255) NOT NULL,    
    department int,
    PRIMARY KEY (id)
);
Model Class
import java.io.Serializable;

import javax.persistence.Entity;
import javax.persistence.GeneratedValue;
import javax.persistence.GenerationType;
import javax.persistence.Id;
import javax.persistence.NamedQuery;
import javax.persistence.Table;

/**
 * The persistent class for the students database table.
 * 
 */
@Entity
@Table(name = "students")
@NamedQuery(name = "Student.findAll", query = "SELECT s FROM Student s")
public class Student implements Serializable {

	private static final long serialVersionUID = 1L;

	@Id
	@GeneratedValue(strategy = GenerationType.IDENTITY)
	private Long id;

	private String department;

	private String firstname;

	private String lastname;

	public Student() {
	}

	public Long getId() {
		return id;
	}

	public void setId(Long id) {
		this.id = id;
	}

	public String getDepartment() {
		return this.department;
	}

	public void setDepartment(String department) {
		this.department = department;
	}

	public String getFirstname() {
		return this.firstname;
	}

	public void setFirstname(String firstname) {
		this.firstname = firstname;
	}

	public String getLastname() {
		return this.lastname;
	}

	public void setLastname(String lastname) {
		this.lastname = lastname;
	}

}
JpaRepository

Here I am using JpaRepository to achieve CRUD Operations easily. JpaRepository have inbuilt function like findAll,findById,save,delete,deleteById

StudentDao

You need to extend JpaRepository in your dao class with Entity class as like below

Here my Entity class is Students.java and Primary Key variable is Long

import org.springframework.data.jpa.repository.JpaRepository;
import org.springframework.stereotype.Repository;

import com.beginnersbug.student.model.Students;

@Repository
public interface StudentDao extends JpaRepository<Students, Long> {

}
Controller Class
import java.util.List;
import java.util.Optional;

import javax.validation.Valid;

import org.springframework.beans.factory.annotation.Autowired;
import org.springframework.http.HttpStatus;
import org.springframework.http.ResponseEntity;
import org.springframework.web.bind.annotation.PathVariable;
import org.springframework.web.bind.annotation.RequestBody;
import org.springframework.web.bind.annotation.RequestMapping;
import org.springframework.web.bind.annotation.RequestMethod;
import org.springframework.web.bind.annotation.RestController;

import com.beginnersbug.studentservice.dao.StudentDao;
import com.beginnersbug.studentservice.model.Student;

@RestController()
@RequestMapping("/api/student")
public class StudentController {

	@Autowired
	StudentDao studentsDao;

	@RequestMapping(method = RequestMethod.GET)
	public List<Student> getStudentsList() {
		return studentsDao.findAll();
	}

	@RequestMapping(value = "/{id}", method = RequestMethod.GET)
	public Student getStudent(@PathVariable("id") String id) {
		Optional<Student> findById = studentsDao.findById(Long.parseLong(id));
		return findById.get();
	}

	@RequestMapping(method = RequestMethod.POST)
	public ResponseEntity<String> addUser(@RequestBody Student student) {
		studentsDao.save(student);
		return new ResponseEntity<String>("Student Created Successfully", HttpStatus.CREATED);

	}

	@RequestMapping(method = RequestMethod.PUT)
	public ResponseEntity<String> updateUser(@Valid @RequestBody Student student) {
		Student updatedStudent = studentsDao.findById(student.getId()).get();
		updatedStudent.setFirstname(student.getFirstname());
		updatedStudent.setLastname(student.getLastname());
		studentsDao.save(updatedStudent);
		return new ResponseEntity<String>("Student Updated Sucessfully ", HttpStatus.NO_CONTENT);

	}

	@RequestMapping(method = RequestMethod.DELETE)
	public ResponseEntity<String> deleteAllStudents() {
		studentsDao.deleteAll();
		return new ResponseEntity<String>("Student deleted ", HttpStatus.NO_CONTENT);
	}

	@RequestMapping(value = "/{id}", method = RequestMethod.DELETE)
	public ResponseEntity<String> deleteStudent(@PathVariable("id") String id) {
		studentsDao.deleteById(Long.parseLong(id));
		return new ResponseEntity<String>("Student deleted ", HttpStatus.NO_CONTENT);
	}

}

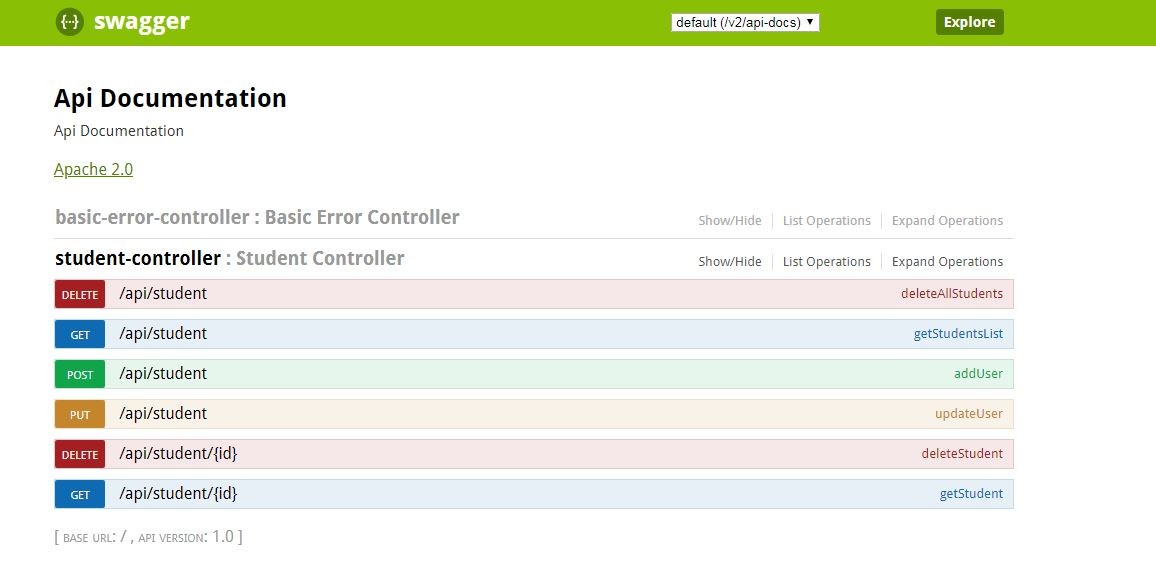
In the above controller class, We are calling findAll, findById, save, delete, deleteById methods for CRUD Operations

Advantage of using JpaRepository

you don’t need to write any query or any methods, all are inbuilt in JpaRepository class

Exceptions

java.sql.SQLException: Field ‘id’ doesn’t have a default value

You will have chance to get above exception while implementing. Make sure below things

You should have below annotation in the model class @GeneratedValue(strategy=GenerationType.IDENTITY)

And also make sure your table has primary key & auto_increment parameter

org.hibernate.id.IdentifierGenerationException: ids for this class must be manually assigned before calling save()

Make sure your model class have <span class="token annotation punctuation">@id</span> and <span class="token annotation punctuation">@GeneratedValue</span><span class="token punctuation">(</span>strategy <span class="token operator">=</span> <span class="token class-name">GenerationType</span><span class="token punctuation">.</span>IDENTITY<span class="token punctuation">)</span> 

Github

https://github.com/rkumar9090/student-service

Related Articles

connect MySQL database from spring boot

Categories
microservices spring-boot

connect MySQL database from spring boot

In this tutorial, we will learn to connect MySQL database from spring boot with Spring Data

What is Spring Data

It makes it easy to use data access technologies, relational and non-relational databases, map-reduce frameworks, and cloud-based data services. 

What You Will learn

End of this tutorial, you will learn to connect MySQL database from spring boot. You can execute SQL queries from Spring boot

Mysql Database Scripts
create database beginnersbug;
use beginnersbug;
CREATE TABLE students (
    id int NOT NULL,
	firstname varchar(255) NOT NULL,
    lastname varchar(255) NOT NULL,    
    department int,
    PRIMARY KEY (id)
);
Dependency
<!-- Added for Database connection -->
<dependency>
	<groupId>org.springframework.boot</groupId>
	<artifactId>spring-boot-starter-data-jpa</artifactId>
</dependency>

<dependency>
	<groupId>mysql</groupId>
	<artifactId>mysql-connector-java</artifactId>
</dependency>
application.properties
# Add database url here
spring.datasource.url=jdbc:mysql://localhost:3306/beginnersbug
spring.datasource.username=root
spring.datasource.password=password
# Add driver class here 
spring.datasource.driver-class-name=com.mysql.jdbc.Driver
spring.jpa.properties.hibernate.dialect = org.hibernate.dialect.MySQL5Dialect

Below class the representation of Students table

Students.java
import javax.persistence.Column;
import javax.persistence.Entity;
import javax.persistence.GeneratedValue;
import javax.persistence.GenerationType;
import javax.persistence.Id;

@Entity
public class Students {

	@Id
	@GeneratedValue(strategy = GenerationType.AUTO)
	@Column(name = "id")
	private long id;

	@Column(name = "firstname")
	private String firstName;

	@Column(name = "lastname")
	private String lastName;

	@Column(name = "department")
	private String department;

	public long getId() {
		return id;
	}

	public void setId(long id) {
		this.id = id;
	}

	public String getFirstName() {
		return firstName;
	}

	public void setFirstName(String firstName) {
		this.firstName = firstName;
	}

	public String getLastName() {
		return lastName;
	}

	public void setLastName(String lastName) {
		this.lastName = lastName;
	}

	public String getDepartment() {
		return department;
	}

	public void setDepartment(String department) {
		this.department = department;
	}

}

Here we extend JpaRepository. which have predefined methods like findAll(),findById(),findAllById(),save(),delete() methods

StudentDao.java
import org.springframework.data.jpa.repository.JpaRepository;
import org.springframework.stereotype.Repository;

import com.beginnersbug.student.model.Students;

@Repository
public interface StudentDao extends JpaRepository<Students, Long> {

}
StudentController.java

import java.util.List;

import org.springframework.beans.factory.annotation.Autowired;
import org.springframework.web.bind.annotation.GetMapping;
import org.springframework.web.bind.annotation.RestController;

import com.beginnersbug.student.dao.StudentDao;
import com.beginnersbug.student.model.Students;

// This annotation used to mention a class as Controller class
@RestController
public class StudentController {

	@Autowired
	StudentDao studentsDao;


	@GetMapping("")
	public List<Students> getStudentsList() {
		List<Students> findAll = studentsDao.findAll();
		return findAll;
	}

}
@Entity

Specifies that the class is an entity. It should be the replication of table

@Id

Specifies the primary key of an entity. The primary key of the table should be defined as @id

@GeneratedValue(strategy = GenerationType.AUTO)

This will specify the generation strategies for the values of primary keys while inserting a record in table.

@Column(name = “id”)

Specifies the mapped column for a persistent property or field. If no Column annotation is specified, the default values apply.

@Repository

This annotation will specify the interface as Dao Class

Time needed: 45 minutes

Steps

  1. Create Spring boot Project

    Follow this tutorial to create spring boot application
    https://beginnersbug.com/how-to-create-spring-boot-application/

  2. Create Database

    Open Mysql Database and create database using below command

    create database beginnersbug;

  3. Create Table

    Create Table with below command

    use beginnersbug;
    CREATE TABLE students (
    id int NOT NULL,
    firstname varchar(255) NOT NULL,
    lastname varchar(255) NOT NULL,
    department int,
    PRIMARY KEY (id)
    );

  4. Create Entity class for Students table

    Please refer above Students.java

  5. Create Dao Interface

    please refer above StudentDao.java

  6. Create Controller class

    Refer above StudentController.java

  7. Run

    Navigate to main class. Right Click and click on RunAs –>JavaApplication

  8. Testing

    Before testing please add some entry in students table
    Open Browser http://localhost:8080/ . You can see the result in the browser

Github

https://github.com/rkumar9090/student

Related Articles

how to create spring boot application

Categories
microservices spring-boot

how to create rest service using spring boot

In this post, we will learn how to create rest service using spring boot

What is Rest Service

REST is Web services which is lightweight, maintainable, and scalable in nature.
The underlying protocol for REST is HTTP, which is the basic web protocol. REST stands for REpresentational State Transfer

What You Will learn

End of this tutorial, you will learn to create a spring boot application with Rest service

Rest Service Annotation
// This annotation used to mention a class as Controller class
@RestController
// Here we are using this to retrieve value
@GetMapping
application.properties
server.port=8080
Dependency
<parent>                                                                    
  <groupId>org.springframework.boot</groupId>                               
  <artifactId>spring-boot-starter-parent</artifactId>                       
  <version>2.2.6.RELEASE</version>                                          
  <relativePath /> <!-- lookup parent from repository -->                   
</parent>

<dependency>                                                                
  <groupId>org.springframework.boot</groupId>                               
  <artifactId>spring-boot-starter-web</artifactId>                          
</dependency>

<dependencyManagement>                                                      
  <dependencies>                                                            
    <dependency>                                                            
      <groupId>org.springframework.cloud</groupId>                          
      <artifactId>spring-cloud-dependencies</artifactId>                    
      <version>${spring-cloud.version}</version>                            
      <type>pom</type>                                                      
      <scope>import</scope>                                                 
    </dependency>                                                           
  </dependencies>                                                           
</dependencyManagement> 
Sample Code
import org.springframework.web.bind.annotation.GetMapping;
import org.springframework.web.bind.annotation.RestController;

// This annotation used to mention a class as Controller class
@RestController
public class StudentController {

	// To Retrieve we can use Get method
	@GetMapping
	public String getName() {
		return "BeginnersBug";
	}
}

In above example we are using a simple method to retrieve a hard coded value from spring boot rest service

@RestController

This annotation is the combination of @Controller and @ResponseBody. Which will mention particular class as a Controller class

@GetMapping

This annotation for mapping HTTP GET requests onto specific handler methods.

@PostMapping

This annotation for mapping HTTP POST requests onto specific handler methods.
Note : Here we didn’t used this annotation

Time needed: 45 minutes

Steps

  1. Create Spring boot Project

    Follow this tutorial to create spring boot application
    https://beginnersbug.com/how-to-create-spring-boot-application/

  2. Create Controller Class

    Once you create and import the Spring boot application in eclipse
    Create a Class, Here I created as StudentController.java

  3. Add @RestController annotation

    Add @RestController annotation to the class level as like in the above sample code

  4. Create a method to return String

    Here I created a simple method with return type as String
    public String getName() {return “BeginnersBug”;}

  5. Add @GetMapping annotation

    Add @GetMapping(“/name”) annotation to the method level as like in the above sample code

  6. Edit application.properties

    Navigate to application.properties under src/main/resources/
    add this server.port=8080

  7. Run

    Navigate to main class. Right Click and click on RunAs –>JavaApplication

  8. Testing

    Open Browser http://localhost:8080/name . You can see the BeginnersBug in the browser

Github

https://github.com/rkumar9090/student

Related Articles

how to create spring boot application