Categories
microservices spring-boot

connect MySQL database from spring boot

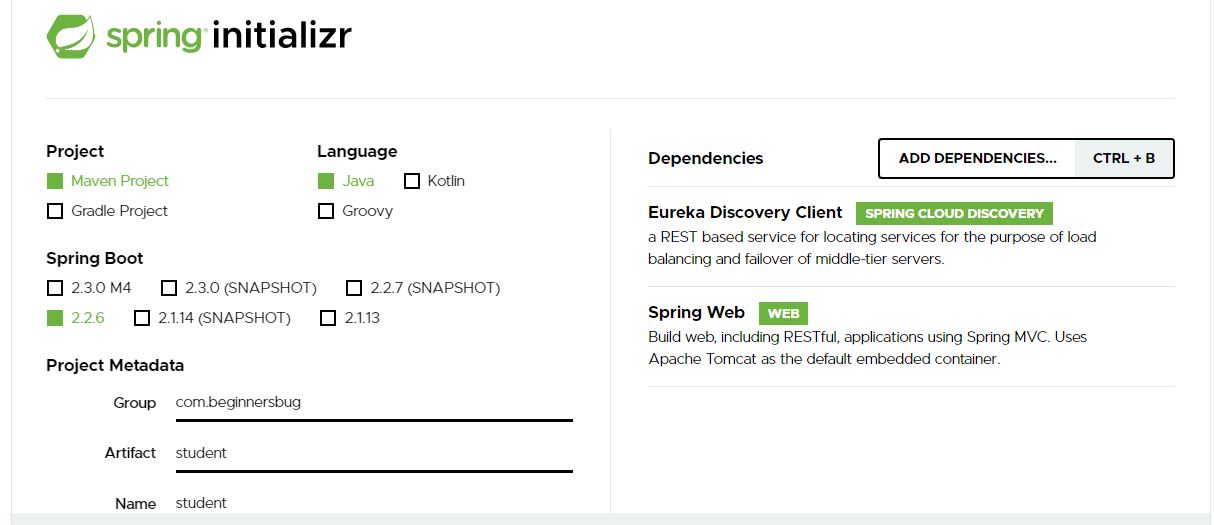
In this tutorial, we will learn to connect MySQL database from spring boot with Spring Data

What is Spring Data

It makes it easy to use data access technologies, relational and non-relational databases, map-reduce frameworks, and cloud-based data services. 

What You Will learn

End of this tutorial, you will learn to connect MySQL database from spring boot. You can execute SQL queries from Spring boot

Mysql Database Scripts
create database beginnersbug;
use beginnersbug;
CREATE TABLE students (
    id int NOT NULL,
	firstname varchar(255) NOT NULL,
    lastname varchar(255) NOT NULL,    
    department int,
    PRIMARY KEY (id)
);
Dependency
<!-- Added for Database connection -->
<dependency>
	<groupId>org.springframework.boot</groupId>
	<artifactId>spring-boot-starter-data-jpa</artifactId>
</dependency>

<dependency>
	<groupId>mysql</groupId>
	<artifactId>mysql-connector-java</artifactId>
</dependency>
application.properties
# Add database url here
spring.datasource.url=jdbc:mysql://localhost:3306/beginnersbug
spring.datasource.username=root
spring.datasource.password=password
# Add driver class here 
spring.datasource.driver-class-name=com.mysql.jdbc.Driver
spring.jpa.properties.hibernate.dialect = org.hibernate.dialect.MySQL5Dialect

Below class the representation of Students table

Students.java
import javax.persistence.Column;
import javax.persistence.Entity;
import javax.persistence.GeneratedValue;
import javax.persistence.GenerationType;
import javax.persistence.Id;

@Entity
public class Students {

	@Id
	@GeneratedValue(strategy = GenerationType.AUTO)
	@Column(name = "id")
	private long id;

	@Column(name = "firstname")
	private String firstName;

	@Column(name = "lastname")
	private String lastName;

	@Column(name = "department")
	private String department;

	public long getId() {
		return id;
	}

	public void setId(long id) {
		this.id = id;
	}

	public String getFirstName() {
		return firstName;
	}

	public void setFirstName(String firstName) {
		this.firstName = firstName;
	}

	public String getLastName() {
		return lastName;
	}

	public void setLastName(String lastName) {
		this.lastName = lastName;
	}

	public String getDepartment() {
		return department;
	}

	public void setDepartment(String department) {
		this.department = department;
	}

}

Here we extend JpaRepository. which have predefined methods like findAll(),findById(),findAllById(),save(),delete() methods

StudentDao.java
import org.springframework.data.jpa.repository.JpaRepository;
import org.springframework.stereotype.Repository;

import com.beginnersbug.student.model.Students;

@Repository
public interface StudentDao extends JpaRepository<Students, Long> {

}
StudentController.java

import java.util.List;

import org.springframework.beans.factory.annotation.Autowired;
import org.springframework.web.bind.annotation.GetMapping;
import org.springframework.web.bind.annotation.RestController;

import com.beginnersbug.student.dao.StudentDao;
import com.beginnersbug.student.model.Students;

// This annotation used to mention a class as Controller class
@RestController
public class StudentController {

	@Autowired
	StudentDao studentsDao;


	@GetMapping("")
	public List<Students> getStudentsList() {
		List<Students> findAll = studentsDao.findAll();
		return findAll;
	}

}
@Entity

Specifies that the class is an entity. It should be the replication of table

@Id

Specifies the primary key of an entity. The primary key of the table should be defined as @id

@GeneratedValue(strategy = GenerationType.AUTO)

This will specify the generation strategies for the values of primary keys while inserting a record in table.

@Column(name = “id”)

Specifies the mapped column for a persistent property or field. If no Column annotation is specified, the default values apply.

@Repository

This annotation will specify the interface as Dao Class

Time needed: 45 minutes

Steps

  1. Create Spring boot Project

    Follow this tutorial to create spring boot application
    https://beginnersbug.com/how-to-create-spring-boot-application/

  2. Create Database

    Open Mysql Database and create database using below command

    create database beginnersbug;

  3. Create Table

    Create Table with below command

    use beginnersbug;
    CREATE TABLE students (
    id int NOT NULL,
    firstname varchar(255) NOT NULL,
    lastname varchar(255) NOT NULL,
    department int,
    PRIMARY KEY (id)
    );

  4. Create Entity class for Students table

    Please refer above Students.java

  5. Create Dao Interface

    please refer above StudentDao.java

  6. Create Controller class

    Refer above StudentController.java

  7. Run

    Navigate to main class. Right Click and click on RunAs –>JavaApplication

  8. Testing

    Before testing please add some entry in students table
    Open Browser http://localhost:8080/ . You can see the result in the browser

Github

https://github.com/rkumar9090/student

Related Articles

how to create spring boot application

Categories
microservices spring-boot

how to create rest service using spring boot

In this post, we will learn how to create rest service using spring boot

What is Rest Service

REST is Web services which is lightweight, maintainable, and scalable in nature.
The underlying protocol for REST is HTTP, which is the basic web protocol. REST stands for REpresentational State Transfer

What You Will learn

End of this tutorial, you will learn to create a spring boot application with Rest service

Rest Service Annotation
// This annotation used to mention a class as Controller class
@RestController
// Here we are using this to retrieve value
@GetMapping
application.properties
server.port=8080
Dependency
<parent>                                                                    
  <groupId>org.springframework.boot</groupId>                               
  <artifactId>spring-boot-starter-parent</artifactId>                       
  <version>2.2.6.RELEASE</version>                                          
  <relativePath /> <!-- lookup parent from repository -->                   
</parent>

<dependency>                                                                
  <groupId>org.springframework.boot</groupId>                               
  <artifactId>spring-boot-starter-web</artifactId>                          
</dependency>

<dependencyManagement>                                                      
  <dependencies>                                                            
    <dependency>                                                            
      <groupId>org.springframework.cloud</groupId>                          
      <artifactId>spring-cloud-dependencies</artifactId>                    
      <version>${spring-cloud.version}</version>                            
      <type>pom</type>                                                      
      <scope>import</scope>                                                 
    </dependency>                                                           
  </dependencies>                                                           
</dependencyManagement> 
Sample Code
import org.springframework.web.bind.annotation.GetMapping;
import org.springframework.web.bind.annotation.RestController;

// This annotation used to mention a class as Controller class
@RestController
public class StudentController {

	// To Retrieve we can use Get method
	@GetMapping
	public String getName() {
		return "BeginnersBug";
	}
}

In above example we are using a simple method to retrieve a hard coded value from spring boot rest service

@RestController

This annotation is the combination of @Controller and @ResponseBody. Which will mention particular class as a Controller class

@GetMapping

This annotation for mapping HTTP GET requests onto specific handler methods.

@PostMapping

This annotation for mapping HTTP POST requests onto specific handler methods.
Note : Here we didn’t used this annotation

Time needed: 45 minutes

Steps

  1. Create Spring boot Project

    Follow this tutorial to create spring boot application
    https://beginnersbug.com/how-to-create-spring-boot-application/

  2. Create Controller Class

    Once you create and import the Spring boot application in eclipse
    Create a Class, Here I created as StudentController.java

  3. Add @RestController annotation

    Add @RestController annotation to the class level as like in the above sample code

  4. Create a method to return String

    Here I created a simple method with return type as String
    public String getName() {return “BeginnersBug”;}

  5. Add @GetMapping annotation

    Add @GetMapping(“/name”) annotation to the method level as like in the above sample code

  6. Edit application.properties

    Navigate to application.properties under src/main/resources/
    add this server.port=8080

  7. Run

    Navigate to main class. Right Click and click on RunAs –>JavaApplication

  8. Testing

    Open Browser http://localhost:8080/name . You can see the BeginnersBug in the browser

Github

https://github.com/rkumar9090/student

Related Articles

how to create spring boot application

Categories
microservices spring-boot

how to create spring boot application

In this tutorial, we will learn how to create spring boot application

What is Spring boot

Spring Boot makes it easy to create stand-alone, production-grade application. It internally use Spring framework and have embedded tomcat servers, nor need to deploy war in any servers

Also easy to create,configure&run

What You Will learn

End of this tutorial, you will learn to create a spring boot application

Annotation
@SpringBootApplication
Dependency
<parent>                                                              
  <groupId>org.springframework.boot</groupId>                         
  <artifactId>spring-boot-starter-parent</artifactId>                 
  <version>2.2.6.RELEASE</version>                                    
  <relativePath /> <!-- lookup parent from repository -->             
</parent>

Time needed: 30 minutes

Steps

  1. Navigate to Spring initializr website

    Click on this url https://start.spring.io/register spring boot micro-services to eureka discovery server

  2. Choose project as Maven

    In this tutorial I am using Maven. You can use gradle or groovy also

  3. Choose language as Java

    Here I am using Java. But we have option for Kotlin & Groovy also

  4. Spring Boot Version

    Please select the stable version, I am using 2.2.6

  5. Enter Group,artifact,Name & description

    Enter the groupid,artifactid&name as you wanted

  6. Packaging as Jar

    Choose Jar, But you have option for war also

  7. Java Verison

    Here I am using java 8

  8. Add Spring Web as dependency

    In case you going you want to expose rest service, Click on the add dependency and select spring web.

  9. Click on the Genreate

    Once you filled all these details click on the Generate Button.
    It will download .rar format

  10. Extract the downloaded file

    Once your download complete, Extract the downloaded .rar file

  11. Import in Eclipse

    After Extracting, Import the project in eclipse

  12. Navigate to Main Class

    Navigate to Main class which will be under src/main/java
    and Make sure the class have @SpringBootApplication annotation

  13. Run

    Right click the class and choose the Run As –> Java Application

  14. Verify logs

    Once your application starts you can see below logs in console

Tomcat started on port(s): 8080 (http) with context path ''
Updating port to 8080
Started StudentApplication in 22.834 seconds (JVM running for 24.503)
Related Articles

create netflix eureka discovery server using spring boot

register spring boot micro-services to eureka discovery

Categories
microservices spring-boot

register spring boot micro-services to eureka discovery

This tutorial is a continuation of our previous tutorial, Here we will learn about register spring boot micro-services to eureka discovery

If you want to learn about eureka please refer my previous post https://beginnersbug.com/create-netflix-eureka-discovery-server-using-spring-boot/

Prerequisite
  • JDK
  • Eclipse
  • Spring boot micro service knowledge
  • Netflix Eureka knowledge
Annotation used to register
@EnableDiscoveryClient
Dependency
<parent>                                                                
  <groupId>org.springframework.boot</groupId>                           
  <artifactId>spring-boot-starter-parent</artifactId>                   
  <version>2.2.6.RELEASE</version>                                      
  <relativePath /> <!-- lookup parent from repository -->               
</parent> 

<dependency>                                                            
  <groupId>org.springframework.cloud</groupId>                          
  <artifactId>spring-cloud-starter-netflix-eureka-client</artifactId>   
</dependency> 

<dependency>                                                            
  <groupId>org.springframework.boot</groupId>                           
  <artifactId>spring-boot-starter-web</artifactId>                      
</dependency>

<dependencyManagement>                                                  
  <dependencies>                                                        
    <dependency>                                                        
      <groupId>org.springframework.cloud</groupId>                      
      <artifactId>spring-cloud-dependencies</artifactId>                
      <version>${spring-cloud.version}</version>                        
      <type>pom</type>                                                  
      <scope>import</scope>                                             
    </dependency>                                                       
  </dependencies>                                                       
</dependencyManagement> 
application.properties
server.port=8080
spring.application.name=student
eureka.client.registerWithEureka=true
eureka.client.fetchRegistry=true
eureka.client.serviceUrl.defaultZone=http://localhost:8761/eureka
Main Class
import org.springframework.boot.SpringApplication;
import org.springframework.boot.autoconfigure.SpringBootApplication;
import org.springframework.cloud.client.discovery.EnableDiscoveryClient;

@SpringBootApplication
@EnableDiscoveryClient
public class StudentApplication {

	public static void main(String[] args) {
		SpringApplication.run(StudentApplication.class, args);
	}
}
Register spring boot

Time needed: 30 minutes

Steps

  1. Create a spring boot application

    Use https://start.spring.io/ to create spring boot applicationregister spring boot micro-services to eureka discovery server

  2. Add Dependency

    Add eureka discovery client and spring web dependency in the text box

  3. Click on the generate

    Once you clicked Generate you project will download

  4. Import into your IDE

    Import the downloaded project into your IDE. Here I used eclipse IDE for my development

  5. Add @EnableDiscoveryClient annotation

    Once you imported you project in IDE, Go to the Main class and add @EnableDiscoveryClient annotation.
    This annotation will register spring boot micro-services to eureka discovery

  6. change application.properties

    eureka.client.registerWithEureka=true
    eureka.client.fetchRegistry=true
    eureka.client.serviceUrl.defaultZone=http://localhost:8761/eureka

  7. Build and Run

    Now you can run your application

  8. Testing

    Open browser and navigate to http://localhost:8761/

  9. You can see your student micro service under Instances

Exception

In case if you didn’t configure the properties properly, you might get below exception.

TransportException: Cannot execute request on any known server
Solution

Confirm below property in your application.properties

eureka<span class="token punctuation">.</span>client<span class="token punctuation">.</span>serviceUrl<span class="token punctuation">.</span>defaultZone<span class="token operator">=</span>http<span class="token operator">:</span><span class="token operator">/</span><span class="token operator">/</span>localhost<span class="token operator">:</span><span class="token number">8761</span><span class="token operator">/</span>eureka

Make sure your discovery server is running on http://localhost:8761

Github

https://github.com/rkumar9090/student

Related Articles

create netflix eureka discovery server using spring boot