Categories
collections java

sorting operations in java using streams

In this example, we learn sorting operations in java using streams

In Java 8 it is easy to sort records from an arraylist

Streams API providing powerful features to sort the records from a list without modifying it

This will returns a stream consisting of the sorted elements

Syntax

Stream sorted()
list.stream().sorted({operations});

Ascending Example

import java.util.ArrayList;
import java.util.List;

public class AscendingSortingStreams {
    public static void main(String[] args) {
        List list = new ArrayList();
        list.add("Ball");
        list.add("Apple");
        list.add("Cat"); // printitng values before sorting
        System.out.println("Values before sorting ");
        list.stream().forEach(x -> System.out.println(x));
        System.out.println("*** Values After sorting ***");
        list.stream().sorted().forEach(x -> System.out.println(x));
    }
}

Output

Values before sorting 
Ball
Apple
Cat
*** Values After  sorting ***
Apple
Ball
Cat

Descending Example

import java.util.ArrayList;
import java.util.Comparator;
import java.util.List;

public class DescendingSortingStreams {
    public static void main(String[] args) {
        List list = new ArrayList();
        list.add("Ball");
        list.add("Apple");
        list.add("Cat");
        // printitng values before sorting
        System.out.println("Values before sorting ");
        list.stream().forEach(x -> System.out.println(x));
        System.out.println("*** Values After sorting ***");
        // Comparator.reverseOrder() will sort the records in descending order
        list.stream().sorted(Comparator.reverseOrder()).forEach(x -> System.out.println(x));
    }
}

Output

Values before sorting 
Ball
Apple
Cat
*** Values After  sorting ***
Cat
Ball
Apple

References

Oracle Docs

Related Articles

filter operations in streams on java 

Iterate list using streams in java

Categories
collections java

filter operations in streams on java 

In this example we learn filter operations in streams on java 

In Java 8 it is easy to filter record from an arraylist

Streams API providing powerful features to filter an record from a list without modifying it

This will returns a stream consisting of the elements of this stream that match the given predicate.

Syntax
Stream filter(Predicate<? super T> predicate)<br><br>
list.stream().filter({operations});
Example
import java.util.ArrayList;
import java.util.List;

public class FilterExample {

	public static void main(String[] args) {

		List studentList = new ArrayList();
		Student student = null;

		student = new Student();
		student.setId(1);
		student.setName("Rajesh");
		student.setAddress("Mumbai");
		studentList.add(student);

		student = new Student();
		student.setId(1);
		student.setName("Kumar");
		student.setAddress("Chennai");
		studentList.add(student);

		studentList.stream().filter(x -> x.getName().equals("Rajesh"))
		.forEach(x -> System.out.print(x.getAddress()));

	}

}
Person.java
public class Student {

	private int id;
	private String name;
	private String address;

	public int getId() {
		return id;
	}

	public void setId(int id) {
		this.id = id;
	}

	public String getName() {
		return name;
	}

	public void setName(String name) {
		this.name = name;
	}

	public String getAddress() {
		return address;
	}

	public void setAddress(String address) {
		this.address = address;
	}

}
Output
Mumbai
Reference

oracle docs

Related Articles

Iterate list using streams in java

iterate stream with index in Java8

Categories
collections java

Iterate list using streams in java

In this example, we will learn about iterate list using streams in java with example
It was introduced on Java 8

Features of Streams
  • No Storage
  • we can do arithmetic operations
  • we can filter the data without removing.
Syntax
list.stream().forEach((x) -> {operations});
Example
import java.util.ArrayList;
import java.util.List;

public class IterateListUsingStreams {

    public static void main(String[] args) {
        List list = new ArrayList();
        list.add("Apple");
        list.add("Pineapple");
        list.add("Papaya");
        list.stream().forEach((x) -> System.out.println(x));
    }

}
Output
Apple
Pineapple
Papaya
Example with Pojo
Student.java
public class Student {

	private int id;
	private String name;
	private String address;

	public int getId() {
		return id;
	}

	public void setId(int id) {
		this.id = id;
	}

	public String getName() {
		return name;
	}

	public void setName(String name) {
		this.name = name;
	}

	public String getAddress() {
		return address;
	}

	public void setAddress(String address) {
		this.address = address;
	}

}
IterateListUsingStreams2 .java
import java.util.ArrayList;
import java.util.List;

public class IterateListUsingStreams2 {

	public static void main(String[] args) {

		List studentList = new ArrayList();
		Student student = null;

		student = new Student();
		student.setId(1);
		student.setName("Rajesh");
		student.setAddress("Chennai");
		studentList.add(student);

		student = new Student();
		student.setId(1);
		student.setName("Kumar");
		student.setAddress("Chennai");
		studentList.add(student);

		studentList.stream().forEach((x) -> System.out.println("Student Id is "+x.getId()+" Name is "+x.getName()));

	}

}
Output
Student Id is 1 Name is Rajesh
Student Id is 1 Name is Kumar
References

https://docs.oracle.com/javase/8/docs/api/java/util/stream/package-summary.html

GitHub

https://github.com/rkumar9090/BeginnersBug/blob/master/BegineersBug/src/com/geeks/example/IterateListUsingStreams.java

https://github.com/rkumar9090/BeginnersBug/blob/master/BegineersBug/src/com/geeks/example/IterateListUsingStreams2.java

Related Articles

iterate stream with index in Java8

ArrayList in java with example

Categories
java maven

Create a Maven Project using command prompt

In this tutorial we will learn to create a maven project using command prompt 

Prerequisites
Syntax
mvn archetype:generate -DgroupId= -DartifactId= -DarchetypeArtifactId=maven-archetype-quickstart -DinteractiveMode=false
Sample
mvn archetype:generate -DgroupId=com.beginnergsbug -DartifactId=sample-project -DarchetypeArtifactId=maven-archetype-quickstart -DinteractiveMode=false
Output

C:\Users\USHA RAJESH\Desktop\sample>mvn archetype:generate -DgroupId=com.beginnergsbug -DartifactId=sample-project -DarchetypeArtifactId=maven-archetype-quickstart -DinteractiveMode=false
[INFO] Scanning for projects...
[INFO]
[INFO] ------------------< org.apache.maven:standalone-pom >-------------------
[INFO] Building Maven Stub Project (No POM) 1
[INFO] --------------------------------[ pom ]---------------------------------
[INFO]
[INFO] >>> maven-archetype-plugin:3.0.1:generate (default-cli) > generate-sources @ standalone-pom >>>
[INFO]
[INFO] <<< maven-archetype-plugin:3.0.1:generate (default-cli) < generate-sources @ standalone-pom <<<
[INFO]
[INFO]
[INFO] --- maven-archetype-plugin:3.0.1:generate (default-cli) @ standalone-pom ---
[INFO] Generating project in Batch mode
Downloading from central: https://repo.maven.apache.org/maven2/org/apache/maven/archetypes/maven-archetype-quickstart/1.0/maven-archetype-quickstart-1.0.pom
Downloaded from central: https://repo.maven.apache.org/maven2/org/apache/maven/archetypes/maven-archetype-quickstart/1.0/maven-archetype-quickstart-1.0.pom (703 B at 1.5 kB/s)
Downloading from central: https://repo.maven.apache.org/maven2/org/apache/maven/archetypes/maven-archetype-bundles/2/maven-archetype-bundles-2.pom
Downloaded from central: https://repo.maven.apache.org/maven2/org/apache/maven/archetypes/maven-archetype-bundles/2/maven-archetype-bundles-2.pom (1.5 kB at 3.5 kB/s)
Downloading from central: https://repo.maven.apache.org/maven2/org/apache/maven/archetype/maven-archetype-parent/1/maven-archetype-parent-1.pom
Downloaded from central: https://repo.maven.apache.org/maven2/org/apache/maven/archetype/maven-archetype-parent/1/maven-archetype-parent-1.pom (1.3 kB at 2.9 kB/s)
Downloading from central: https://repo.maven.apache.org/maven2/org/apache/maven/archetypes/maven-archetype-quickstart/1.0/maven-archetype-quickstart-1.0.jar
Downloaded from central: https://repo.maven.apache.org/maven2/org/apache/maven/archetypes/maven-archetype-quickstart/1.0/maven-archetype-quickstart-1.0.jar (4.3 kB at 7.6 kB/s)
[INFO] ----------------------------------------------------------------------------
[INFO] Using following parameters for creating project from Old (1.x) Archetype: maven-archetype-quickstart:1.0
[INFO] ----------------------------------------------------------------------------
[INFO] Parameter: basedir, Value: C:\Users\USHA RAJESH\Desktop\sample
[INFO] Parameter: package, Value: com.beginnergsbug
[INFO] Parameter: groupId, Value: com.beginnergsbug
[INFO] Parameter: artifactId, Value: sample-project
[INFO] Parameter: packageName, Value: com.beginnergsbug
[INFO] Parameter: version, Value: 1.0-SNAPSHOT
[INFO] project created from Old (1.x) Archetype in dir: C:\Users\USHA RAJESH\Desktop\sample\sample-project
[INFO] ------------------------------------------------------------------------
[INFO] BUILD SUCCESS
[INFO] ------------------------------------------------------------------------
[INFO] Total time:  12.855 s
[INFO] Finished at: 2020-01-31T09:17:42+05:30
[INFO] ------------------------------------------------------------------------

C:\Users\USHA RAJESH\Desktop\sample>     
Syntax Explanation

mvn maven base command

archetype:generate= to generate a maven project

-DgroupId= group id for the project

-DartifactId= artifact id it is similar to project name

-DarchetypeArtifactId= type of archetype

-DinteractiveMode= true/false 

Related Articles

How to install Apache Maven in windows

Categories
java maven

Set Maven Home in Windows

In this tutorial we will learn to set Maven home in windows.

Please refer my previous tutorial to download and install maven.

This is the follow up tutorial of my previous post

Prerequisites

Step 1

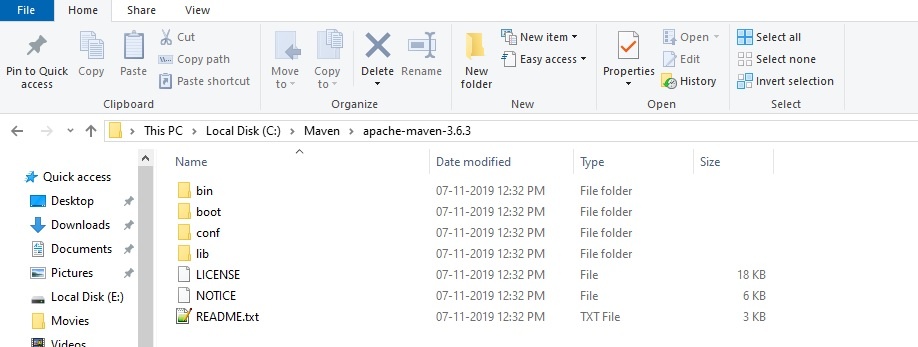
Copy Maven installed Path

In my case it is C:\Maven\apache-maven-3.6.3

Apache Maven Home

Step 2

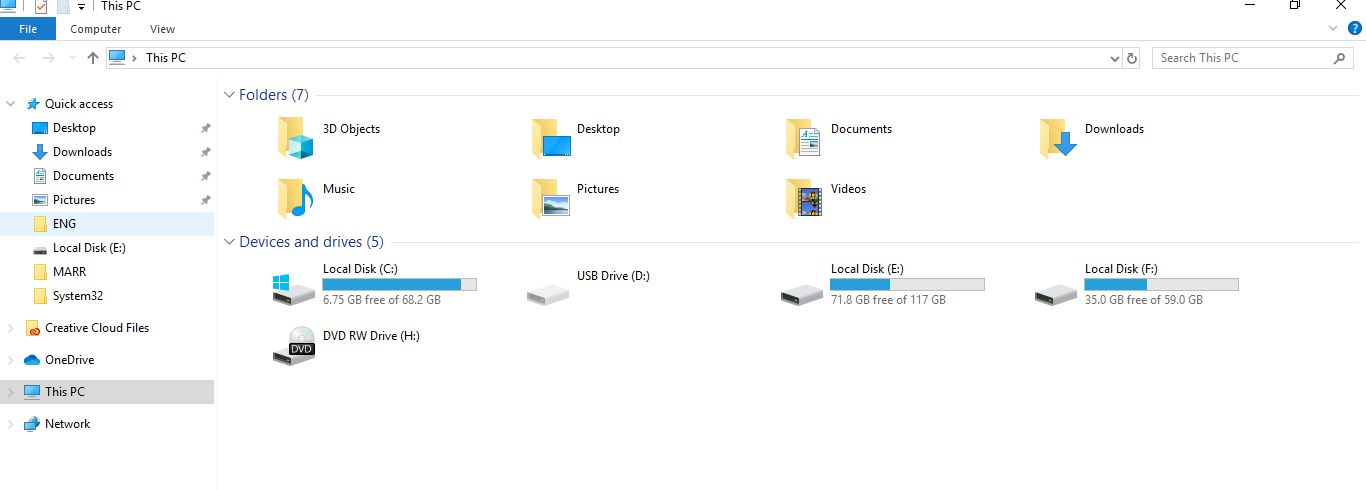
Open My computer 

Step 3

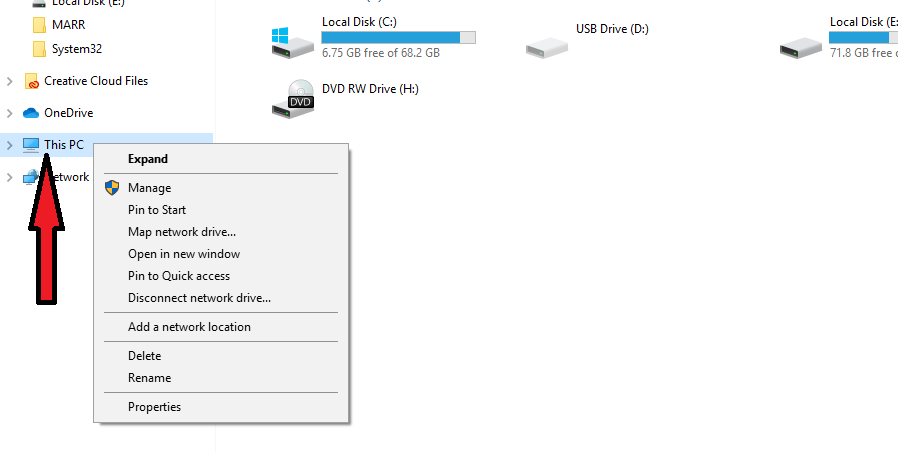
Right click the This PC

Step 4

Click on Properties

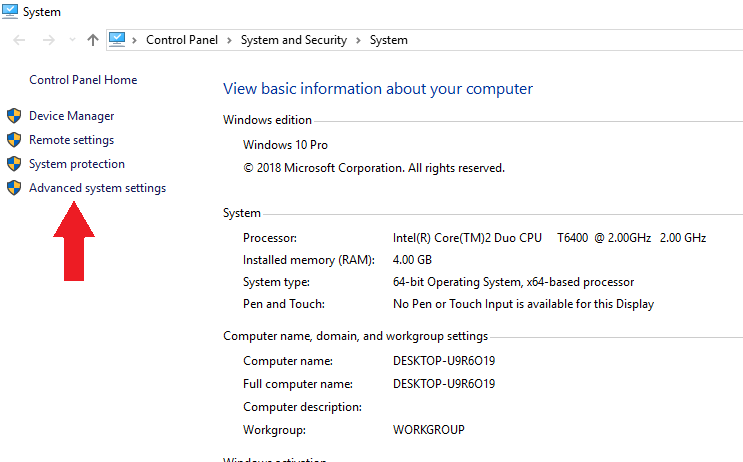
Step 5

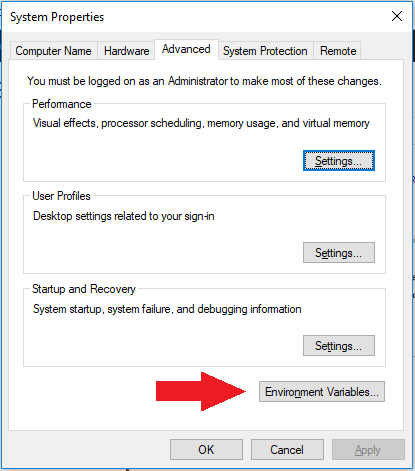
Click on Advanced system settings

Step 6

Click on the Environment variables

Step 7

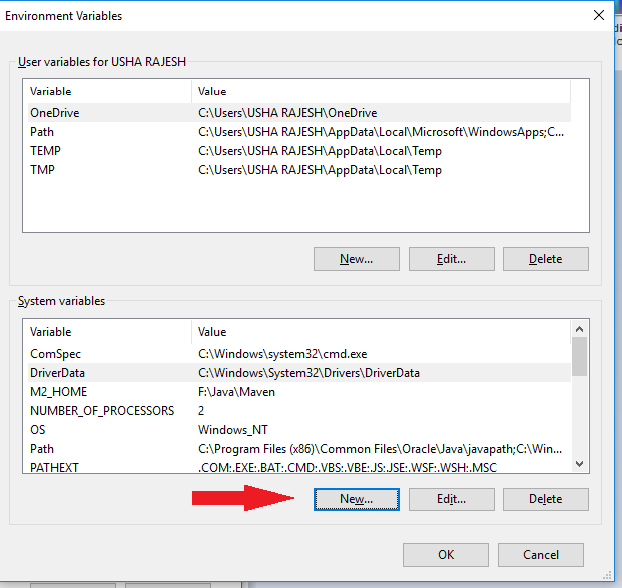
Click New on the System variables column

Step 8

Enter Variable name as M2_HOME
Enter Variable value as C:\Maven\apache-maven-3.6.3
click ok
Note :
Variable name should be CAPS
Variable value should be as your maven installed path
don’t copy until bin folder

M2_HOME

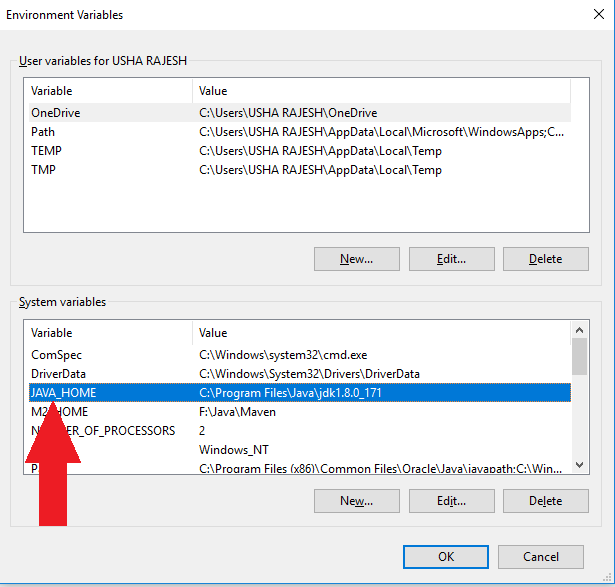
Step 9

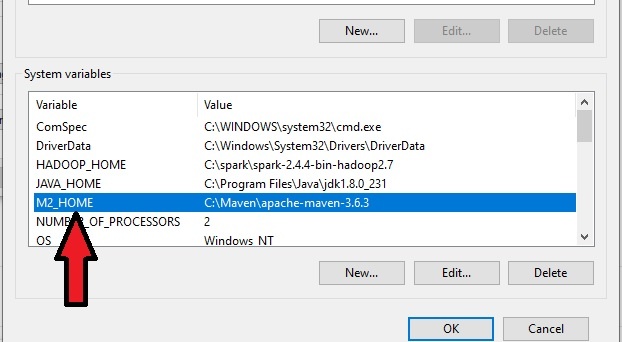
After Click OK
we can see the M2_HOME variable in environment variables

Step 10

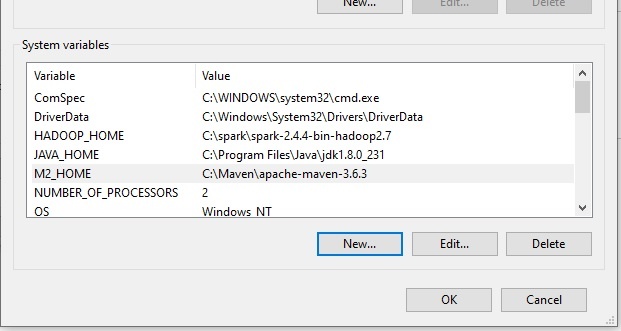
After Click OK
we can see the M2_HOME variable in environment variables

Step 11

Now we need to need to add this JAVA_HOME to Path variable
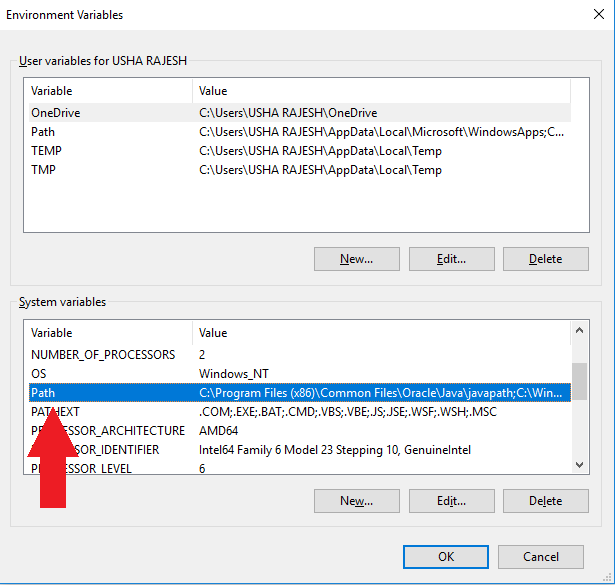
Search for Path variable in same system variables window

Step 12

After selecting Path variable
Click on Edit button

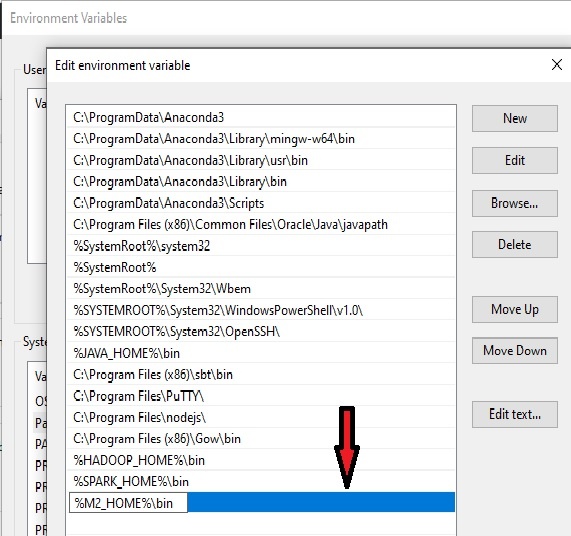
Step 13

Edit environment variable dialog box will appear
Click on the New button

Step 14

Text box will appear on the list
add %M2_HOME%\bin in the text box

Step 15

Click OK after adding %M2_HOME%\bin
Now close all the windows

Step 16

We can verify by below steps
open the command prompt
type mvn -version

mvn -version

That’s it !! 

Related Articles

Create a Maven Project using command prompt

Categories
java maven

How to install Apache Maven in windows

In this tutorial we will learn about install apache maven in windows operating system

Maven is a software project management tool like gradle
maintaining by Apache 

If you are new to maven then below points will help you to understand maven

  • It is one of the easiest way to create a Java project
  • Easy to manage the dependencies (external jars)
  • Easy to build a jar or war
  • The project size will be so less

pom.xml

pom stands for Project Object Model
pom.xml is the heart of a maven project
It is a xml file which will have all dependency and build details for that project 

Prerequisites

Step 1

Download apache maven binary zip version from below URL 
http://apachemirror.wuchna.com/maven/maven-3/3.6.3/binaries/apache-maven-3.6.3-bin.zip

Step 2

After downloading zip file.

Extract and place in some folder

In this example I am creating Maven folder on C: Directory of my windows Operating system

The folder path is like C:\Maven\apache-maven-3.6.3

Apache Maven Home

That’s it !! 

We installed Apache maven in windows. Please follow next tutorial to setup maven home 

We can use mvn command only if we have JAVA_HOME and M2_HOME in environment variables

Refer this tutorial to set M2_HOME 
https://beginnersbug.com/set-maven-home-in-windows/

if not we will face below exceptions

The JAVA_HOME environment variable is not defined correctly
This environment variable is needed to run this program
NB: JAVA_HOME should point to a JDK not a JRE
'mvn' is not recognized as an internal or external command,
operable program or batch file.
Related Articles

Set Maven Home in Windows

Create a Maven Project using command prompt

Categories
java

Run shell script from java with Example

In this example we will learn to run bash command and invoking a shell script file from java 
Java is provided a feature to execute shell script from code 
Runtime.getRuntime().exec(“”)
Above line will help us to execute bash command from java code 
we need to provide the shell script inside the exec method 

Printing Hostname from java

import java.io.BufferedReader;
import java.io.InputStreamReader;

public class ShellScriptExample {

	public static void main(String[] args) {
		try {

			Process exec = Runtime.getRuntime().exec("hostname");
			//below line will wait to execute the command
			exec.waitFor();
			BufferedReader reader = new BufferedReader(new InputStreamReader(exec.getInputStream()));
			String line;
			while ((line = reader.readLine()) != null) {
				System.out.println(line);
			}
		} catch (Exception e) {
			e.printStackTrace();
		}

	}

}
Output
DESKTOP-U9R6O19
Printing Ip address from Java

import java.io.BufferedReader;
import java.io.InputStreamReader;

public class ShellScriptExample {

	public static void main(String[] args) {
		try {

			Process exec = Runtime.getRuntime().exec("ipconfig");
			//below line will wait to execute the command
			exec.waitFor();
			BufferedReader reader = new BufferedReader(new InputStreamReader(exec.getInputStream()));
			String line;
			while ((line = reader.readLine()) != null) {
				System.out.println(line);
			}
		} catch (Exception e) {
			e.printStackTrace();
		}

	}

}

Windows IP Configuration


Ethernet adapter Ethernet:

   Media State . . . . . . . . . . . : Media disconnected
   Connection-specific DNS Suffix  . : 

Wireless LAN adapter Wi-Fi:

   Connection-specific DNS Suffix  . : 
   Link-local IPv6 Address . . . . . : fe80::dc21:c38b:f5cb:e4e2%17
   IPv4 Address. . . . . . . . . . . : ***
   Subnet Mask . . . . . . . . . . . : ****
   Default Gateway . . . . . . . . . : ***
                                       192.168.1.1

Ethernet adapter vEthernet (Default Switch):

   Connection-specific DNS Suffix  . : 
   Link-local IPv6 Address . . . . . : fe80::1859:16f5:8d15:fd81%20
   IPv4 Address. . . . . . . . . . . : ***
   Subnet Mask . . . . . . . . . . . : **
   Default Gateway . . . . . . . . . : 
Invoking Shell file from Java

import java.io.BufferedReader;
import java.io.InputStreamReader;

public class InvokingShellFileExample {

	public static void main(String[] args) {
		try {

			Process exec = Runtime.getRuntime().exec("C://script//shellscript.bat");
			// below line will wait to execute the command
			exec.waitFor();
			BufferedReader reader = new BufferedReader(new InputStreamReader(exec.getInputStream()));
			String line;
			while ((line = reader.readLine()) != null) {
				System.out.println(line);
			}
		} catch (Exception e) {
			e.printStackTrace();
		}

	}
}
Output
F:\BeginnersBug\BegineersBug>hostname
DESKTOP-U9R6O19
Github

https://github.com/rkumar9090/BeginnersBug/blob/master/BegineersBug/src/com/geeks/example/ShellScriptExample.java

https://github.com/rkumar9090/BeginnersBug/blob/master/BegineersBug/src/com/geeks/example/InvokingShellFileExample.java

Categories
java

Ternary Operator in java with example

Ternary Operator

In this example we will learn to use ternary operator in java with example

  • Ternary Operator will be used instead of if else 
  • We can use this ternary operator to do null check
  • we can use this to check numeric operations

Syntax

(conditon) ? true : false ;

Example with String

public class TernaryOperatorExample {

	public static void main(String[] args) {
		String s = null;
		System.out.println((s == null) ? "String s is null" : "String s is not null");
	}
}

Output

String s is not null

Example with numeric operations

public class TernaryOperatorWithNumeric {

	public static void main(String[] args) {
		int i = 10;
		System.out.println((i > 10) ? true : false);
	}
}

Output

false

Github link

https://github.com/rkumar9090/BeginnersBug/blob/master/BegineersBug/src/com/geeks/example/TernaryOperatorExample.java

https://github.com/rkumar9090/BeginnersBug/blob/master/BegineersBug/src/com/geeks/example/TernaryOperatorWithNumeric.java

Categories
java

Switch Case in Java with Example


Switch Case

  • Switch Case in Java with Example is most used condition based approach in java.
  • It is similar from other programming language like sql, C,C++. 

Syntax


		switch (key) {
		case value:
			break;

		default:
			break;
		}
  • Switch Case will print matching conditions 
  • If none of the condition matches default block will execute 
  • break statement is necessary here 
  • case statement are case sensitive 

Example


public class SwitchCaseExample {

	public static void main(String[] args) {
		try {
			String language = "python";

			switch (language) {
			case "JAVA":
				System.out.println("Java is choosed");
				break;
			case "C++":
				System.out.println("C++ is choosed");
			case "python":
				System.out.println("Python is choosed");
				break;
			default:
				System.out.println("default");
				break;
			}
		} catch (Exception e) {
			e.printStackTrace();
		}
	}

}

Output

Python is choosed

Github Link

https://github.com/rkumar9090/BeginnersBug/blob/master/BegineersBug/src/com/geeks/example/SwitchCaseExample.java

Categories
java

How to set java home in windows

Prerequisites

Step 1

Copy jdk home path
example: C:\Program Files\Java\jdk1.8.0_171

Step 2

Open My computer

Step 3

Right Click This PC

Step 4

Click on Properties

Step 5

Click on Advanced system settings

Step 6

Click on the Environment variables

Step 7

Click New on the System variables column

Step 8

Enter Variable name as JAVA_HOME
Enter Variable value as C:\Program Files\Java\jdk1.8.0_171
click ok
Note :
Variable name should be CAPS
Variable value should be as your java installed path
don’t copy until bin folder

Step 9

After Click OK
we can see the JAVA_HOME variable in environment variables

Step 10

now we need to need to add this JAVA_HOME to Path variable
Search for Path variable in same system variables window

Step 11

After selecting Path variable
Click on Edit button

Step 12

Edit environment variable dialog box will appear
Click on the New button

Step 13

Text box will appear on the list
add %JAVA_HOME%\bin in the text box

Step 14

Click OK after adding %JAVA_HOME%\bin
Now close all the windows

Step 15

We can verify by below steps
open the command prompt
type java -version