Categories
spark

spark submit options

In this post , let us get to know about spark submit options .

spark submit options

spark submit options mentioned below contain < > .We can replace them with respective values . Following are the few of the prominent spark submit options available .

Everything will contain option name and its values . For instance , — master is the option name and can pass value next to it .

spark-submit \
--master < > \
--deploy-mode < > \
--keytab < > \
--principal < > \
--driver-memory < > \
--executor-memory  < > \
--executor-cores  < > \
--num-executors  < > \
--class  < > \
<jar name>
--conf <key>=<value> 

master : It is suitable for local mode

deploy mode : default – client

This is applicable only for cluster set up – YARN , standalone . It can have client or cluster as the value . It depends on where driver program needs to run . That is on worker node (cluster mode ) or local machine (client mode) .

keytab and principal : 

Every host that provides a service must have a local file, called a keytab . This file contains the pairs of Kerberos principals and encrypted keys. It allow scripts to authenticate using Kerberos automatically . Without any  involvement of human while accessing the password stored in a file.

driver-memory : Memory required for driver program which enclose the main method . The default value is 1 GB 

executor-memory : Executors are worker nodes responsible for running individual tasks in a given Spark job . Memory allocated for each executor which could be assigned based on some calculation.

executor-cores : Number of cores each executor can have.

num-executors : Specify the number of executors to have .Running executors with too much memory often results in excessive garbage collection delays.
Whereas running tiny executors throws away the benefits that come from running multiple tasks in a single JVM. (with a single core and just enough memory needed to run a single task, for example) . It is better to calculate before assigning .

class : class file name 

Other options :

–conf <key>=<value>

For instance , –conf spark.sql.files.maxPartitionBytes = 128

spark.sql.files.maxPartitionBytes : default (128 MB)
spark.sql.files.openCostInBytes : default (4 MB)
spark.sql.files.minPartitionNum
spark.sql.broadcastTimeout : default (300)
spark.sql.autoBroadcastJoinThreshold : default (10 MB)
spark.sql.shuffle.partitions : default (200)
spark.sql.sources.parallelPartitionDiscovery.threshold : default (32)
spark.sql.sources.parallelPartitionDiscovery.parallelism : default (10000)

Reference

https://spark.apache.org/docs/latest/sql-performance-tuning.html#other-configuration-options

Categories
spark

spark local and standalone mode

In this post , let us have a look at spark local and standalone mode .

Local mode

Other than the local and standalone mode which we are going to see in this post , we do have few other deployment mode  as well .

Local Mode is the default mode of spark which runs everything on the same machine.

In the case of not mentioning –master flag to the command whether spark-shell or spark-submit , ideally it means it is running in local mode.

Other way is to pass –master option with local as argument which defaults to 1 thread. 

We can even increase the number of threads by providing the required number within the square bracket . For instance , spark-shell –master local[2] .

By using asterisks instead like local[*] we can use as many threads as the number of processors available to the Java virtual machine.

spark-submit --class <class name> --master local[8] <jar file>

Standalone mode

  • Spark standalone cluster in client deploy mode
  • Spark standalone cluster in cluster deploy mode with supervise
  • Run a Python application on a Spark standalone cluster
Spark standalone cluster in client deploy mode

Application will submit on the gateway machine which is interlinked with any other worker machines physically . The input and output of the application is attached to the console . And so this mode well suite for the application which include REPL (i.e Spark shell) .In client mode, the driver launches directly within the spark-submit process which acts as a client to the cluster.

spark-submit --class <class name> --master <spark://host id> --executor-memory 20G --total-executor-cores 100 <jar name> 
Spark standalone cluster in cluster deploy mode with supervise

For a Spark standalone cluster with cluster deploy mode, you can also provide –supervise.  The driver restarts automatically incase of any kind of failures with a non-zero exit code.

Few applications will submit from a machine far from the local machine . It is common to use cluster mode to minimize network latency between the drivers and the executors.

spark-submit --class <class name> --master <spark://host id> --deploy-mode cluster --supervise --executor-memory 20G --total-executor-cores 100 <jar name>
Run a Python application on a Spark standalone cluster

Currently, the standalone mode does not support cluster mode for Python applications.

spark-submit --master <spark:host id> <python file>

Reference

https://spark.apache.org/docs/latest/submitting-applications.html

Categories
spark

createTempView and createGlobalTempView

In this post , let us learn the difference between createTempView and createGlobalTempView

createOrReplaceTempView

In Spark 2.0 , createOrReplaceTempView came into picture to replace registerTempTable. It creates or replaces an in-memory reference to the Dataframe in the form of local temporary view . Lifetime of this view is dependent to SparkSession class .

df=spark.sql("select * from table")
df.createOrReplaceTempView("ViewName")

Both createOrReplaceTempView and createTempView used for creating temporary view from the existing dataframe .

If the view already exists createOrReplaceTempView replace the existing view with the new one . Wheareas  ‘already exists’ exception will be thrown for createTempView.

The following command is used for dropping the view . One another way to make the view out of scope is by shuttingdown the session using stop()

spark.catalog.dropTempView("ViewName")

Libraries required :

pyspark.sql.DataFrame.createOrReplaceTempView
pyspark.sql.DataFrame.createTempView
pyspark.sql.Catalog.dropTempView

createOrReplaceGlobalTempView

It creates references in the form of global temporary view which used across spark sessions. Life time of this view is dependent to spark application itself

df=spark.sql("select * from table")
df.createOrReplaceGlobalTempView("ViewName")

Following is the command to drop the view , or can stop() the session

spark.catalog.dropGlobalTempView("ViewName")

Libraries required

pyspark.sql.DataFrame.createOrReplaceGlobalTempView
pyspark.sql.DataFrame.createGlobalTempView
pyspark.sql.Catalog.dropGlobalTempView

Inorder to get more information on the difference between createTempView and createGlobalTempView , please refer the below URL https://spark.apache.org/docs/latest/api/python/reference/api/pyspark.sql.DataFrame.createGlobalTempView.html

Categories
pyspark

row_number in pyspark dataframe

In this post, we will learn to use row_number in pyspark dataframe with examples.

What is row_number ?

This row_number in pyspark dataframe will assign consecutive numbering over a set of rows.
The window function in pyspark dataframe helps us to achieve it.
To get to know more about window function, Please refer to the below link.

Creating dataframe 

Before moving into the concept, Let us create a dataframe using the below program.

from pyspark.sql import Row
# Creating dictionary with employee and their salary details 
dict1=[{"Emp_id" : 123 , "Dep_name" : "Computer"  , "Salary" : 2500 } , {"Emp_id" : 456 ,"Dep_name"  :"Economy" , "Salary" : 4500} , {"Emp_id" : 789 , "Dep_name" : "Economy" , "Salary" : 7200 } , {"Emp_id" : 564 , "Dep_name" : "Computer" , "Salary" : 1400 } , {"Emp_id" : 987 , "Dep_name" : "History" , "Salary" : 3450 }, {"Emp_id" :678 , "Dep_name" :"Economy" ,"Salary": 6700},{"Emp_id" : 943 , "Dep_name" : "Computer" , "Salary" : 3200 }]
# Creating RDD from the dictionary created above
rdd1=sc.parallelize(dict1)
# Converting RDD to dataframe
df1=rdd1.toDF()
print("Printing the dataframe df1")
df1.show()

Thus we created the below dataframe with the salary details of some employees from various departments.

Printing the dataframe df1
+--------+------+------+
|Dep_name|Emp_id|Salary|
+--------+------+------+
|Computer|   123|  2500|
| Economy|   456|  4500|
| Economy|   789|  7200|
|Computer|   564|  1400|
| History|   987|  3450|
| Economy|   678|  6700|
|Computer|   943|  3200|
+--------+------+------+
Sample program – row_number

With the below segment of the code, we can populate the row number based on the Salary for each department separately.

We need to import the following libraries before using the window and row_number in the code.

orderBy clause is used for sorting the values before generating the row number.

from pyspark.sql import Window
from pyspark.sql.functions import row_number
df2=df1.withColumn("row_num",row_number().over(Window.partitionBy("Dep_name").orderBy("Salary")))
print("Printing the dataframe df2")
df2.show()
Printing the dataframe df2
+--------+------+------+-------+
|Dep_name|Emp_id|Salary|row_num|
+--------+------+------+-------+
|Computer|   564|  1400|      1|
|Computer|   123|  2500|      2|
|Computer|   943|  3200|      3|
| History|   987|  3450|      1|
| Economy|   456|  4500|      1|
| Economy|   678|  6700|      2|
| Economy|   789|  7200|      3|
+--------+------+------+-------+
Reference

https://spark.apache.org/docs/2.1.0/api/python/pyspark.sql.html#pyspark.sql.functions.row_number

Categories
pyspark

window function in pyspark with example

In this post, We will learn about window function in pyspark with example.

What is window function ?

Window function in pyspark acts in a similar way as a group by clause in SQL.

It basically groups a set of rows based on the particular column and performs some aggregating function over the group.

Sample program for creating dataframe

For understanding the concept better, we will create a dataframe containing the salary details of some employees using the below program.

# Creating dictionary with employee and their salary details 
dict1=[{"Emp_id" : 123 , "Dep_name" : "Computer"  , "Salary" : 2500 } , {"Emp_id" : 456 ,"Dep_name"  :"Economy" , "Salary" : 4500} , {"Emp_id" : 789 , "Dep_name" : "History" , "Salary" : 6700 } , {"Emp_id" : 564 , "Dep_name" : "Computer" , "Salary" : 1400 } , {"Emp_id" : 987 , "Dep_name" : "History" , "Salary" : 3450 }, {"Emp_id" :678 , "Dep_name" :"Economy" ,"Salary": 6700}]
# Creating RDD from the dictionary created above
rdd1=sc.parallelize(dict1)
# Converting RDD to dataframe
df1=rdd1.toDF()
print("Printing the dataframe df1")
df1.show()
Printing the dataframe df1
+--------+------+------+
|Dep_name|Emp_id|Salary|
+--------+------+------+
|Computer|   123|  2500|
| Economy|   456|  4500|
| History|   789|  6700|
|Computer|   564|  1400|
| History|   987|  3450|
| Economy|   678|  6700|
+--------+------+------+
How to use window function in our program?

In the below segment of code, the window function used to get the sum of the salaries over each department.

The following library is required before executing the code.

from pyspark.sql import Window

partitionBy includes the column name based on which the grouping needs to be done.

df = df1.withColumn("Sum",sum('Salary').over(Window.partitionBy('Dep_name')))
print("Printing the result")
df.show()
Printing the result
+--------+------+------+-----+
|Dep_name|Emp_id|Salary|  Sum|
+--------+------+------+-----+
|Computer|   123|  2500| 3900|
|Computer|   564|  1400| 3900|
| History|   789|  6700|10150|
| History|   987|  3450|10150|
| Economy|   456|  4500|11200|
| Economy|   678|  6700|11200|
+--------+------+------+-----+
Other aggregate functions

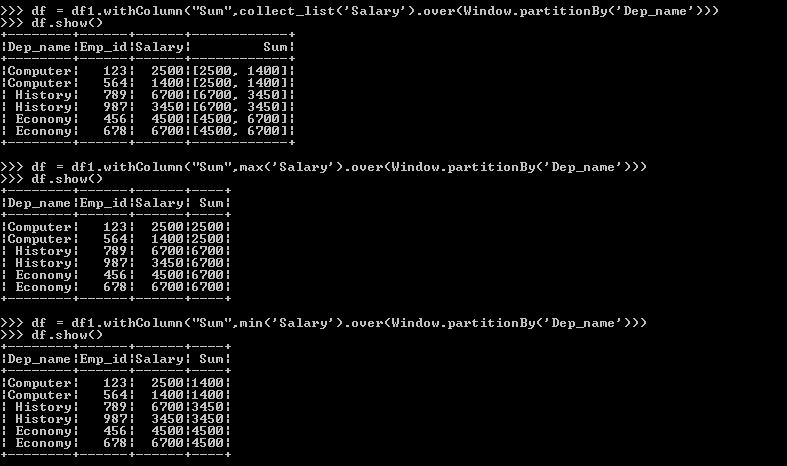
As above, we can do for all the other aggregate functions also. Some of those aggregate functions are max(),Avg(),min(),collect_list().

Below are the few examples of those aggregate functions.

window function with some other aggregate functions

Reference

https://medium.com/@rbahaguejr/window-function-on-pyspark-17cc774b833a

Window function in pyspark with example using advanced aggregate functions like row_number(), rank(),dense_rank() can be discussed in our other blogs .