Categories
spark

RDD , Dataframe and Dataset in spark

In this post , let us learn about RDD , Dataframe and Dataset in spark

Resilient Distributed Datasets – RDD

RDD is the fundamental data structure in spark .

  • fault-tolerant
  • in memory
  • immutable distributed collection of elements
  • partitioned across nodes in the cluster and operate in parallel
  • low-level API that offers transformation and action

Two ways to create RDDs:

  1. Parallelizing an existing collection
  2. Referencing external storage system

Parallelizing an existing collection:

val a = Array(1, 2, 3, 4)
val b = sc.parallelize(a)

Referencing external storage system:

Referenced external storage system such as a shared filesystem, HDFS, HBase, or any data source offering a Hadoop InputFormat .
Text file RDDs created using SparkContext’s textFile method which takes a URI for the file (either a local path or a hdfs://, s3a://, etc) and reads it as a collection of lines. 

val c = sc.textFile("data.txt")

By default, Spark creates one partition for each block of the file (default block size in HDFS – 128MB).

We can even increase the partitions by passing a larger value as second argument to textFile method but cannot have fewer partitions than blocks.

Dataframe

A DataFrame is a Dataset organized into named columns , conceptually equivalent to a table in a relational database or a data frame in R/Python, but with richer optimizations.

Dataframes created from a wide array of sources such as: structured data files, tables in Hive, external databases, or existing RDDs.

The DataFrame API is available in Scala, Java, Python, and R. In Scala and Java, a DataFrame is represented by a Dataset of Rows. In the Scala API, DataFrame is simply a type alias of Dataset[Row]. While, in Java API, users need to use Dataset<Row> to represent a DataFrame.

Dataset

A Dataset is a distributed collection of data and a new interface added in Spark 1.6 that provides the benefits of RDDs (strong typing, ability to use powerful lambda functions) with the benefits of Spark SQL’s optimized execution engine.

A Dataset can be constructed from JVM objects and then manipulated using functional transformations (map, flatMap, filter, etc.).

The Dataset API is available in Scala and Java. Python does not have the support for the Dataset API. But due to Python’s dynamic nature, many of the benefits of the Dataset API are already available (i.e. you can access the field of a row by name naturally row.columnName). The case for R is similar.

RDDs and Datasets are type safe means that compiler know the Columns and it’s data type of the Column whether it is Long, String, etc…. But, In Dataframe, every time when you call an action, collect() for instance,then it will return the result as an Array of Rows not as Long, String data type.


Categories
pandas python

create dataframe in python using pandas

In this post, we will learn about create dataframe in python using pandas. There are multiple ways to create dataframe in python

DataFrame

Dataframe is one of the data types in python as like string, int. It will look like a table.

It consists of rows and columns. We can say that it is a two-dimensional array.

Here we are using pandas to create the data frame. Pandas is a fast and powerful open-source package.
For More details refer the doc below
https://pandas.pydata.org/

Installing Pandas Libraries using pip

pip install pandas

Installing Pandas libraries using conda

conda install pandas

In order to use pandas, we should install a pandas package on our machine.
Open the terminal/Command prompt and run any one of the above commands
Once you installed we need to import using the import command below

import pandas as pd

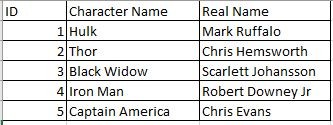
Here I am going to create a data frame with avengers details as like below image

Below are the multiple ways to create dataframe in python using pandas.

  • Create data frame from list
  • Create data frame using dictionary
  • Create data frame from csv file
  • Load Mysql table as dataframe using pandas
  • Load Mongodb collection as dataframe
1. Create data frame from list
import pandas as pd

avengers_column_details = ['ID', 'Character Name', 'Real Name']
avengers_data = [[1, 'Hulk', 'Mark Ruffalo'], [2, 'Thor', 'Chris Hemsworth'], [3, 'Black Widow', 'Scarlett Johansson'], [4, 'Iron Man', 'Robert Downey Jr'],[5, 'Captain America', 'Chris Evans']]

df_avengers_details = pd.DataFrame(avengers_data, columns=avengers_column_details)
print("Created Dataframe using List")
print(df_avengers_details)
Output using list
 Created Dataframe using List
    ID   Character Name           Real Name
 0   1             Hulk        Mark Ruffalo
 1   2             Thor     Chris Hemsworth
 2   3      Black Widow  Scarlett Johansson
 3   4         Iron Man    Robert Downey Jr
 4   5  Captain America         Chris Evans

In the above example, we have created a data frame using the list.

2. Create data frame using dictionary
import pandas as pd

dict_avengers_data={"ID": [1, 2, 3, 4, 5],
                    "Character Name": ['Hulk', 'Thor', 'Black Widow', 'Iron Man', 'Captain America'],
                    "Real Name": ['Mark Ruffalo', 'Chris Hemsworth', 'Scarlett Johansson', 'Robert Downey Jr', 'Chris Evans']}
df_avengers_dict = pd.DataFrame(dict_avengers_data)
print("Created Dataframe using dict")
print(df_avengers_dict)
Output
Created Dataframe using dict
    ID   Character Name           Real Name
 0   1             Hulk        Mark Ruffalo
 1   2             Thor     Chris Hemsworth
 2   3      Black Widow  Scarlett Johansson
 3   4         Iron Man    Robert Downey Jr
 4   5  Captain America         Chris Evans

Here we are created a data frame using the dictionary. Printed the output.

3. Create data frame from csv file

In the below code, we are importing a CSV file as a data frame with the help of pandas library

import pandas as pd

df_avenger_data_csv = pd.read_csv("D://avenger_details.csv")
print("Created Dataframe using csv file")
print(df_avenger_data_csv)
print("\n")
Output
Created Dataframe using csv file
    ID   Character Name           Real Name
 0   1             Hulk        Mark Ruffalo
 1   2             Thor     Chris Hemsworth
 2   3      Black Widow  Scarlett Johansson
 3   4         Iron Man    Robert Downey Jr
 4   5  Captain America         Chris Evans
4. Load Mysql table as dataframe using pandas

To load the MySQL table data as a data frame we need a MySQL connector library. you can install using the below command

 pip install mysql-connector-python

Once you installed the MySQL connector in your system. you need to create the MySQL connection object and need to pass the connection object and query to the pandas as below

import pandas as pd
import mysql.connector

mysql_connection = mysql.connector.connect(host="localhost", user="root", password="password", database="avengers")
df = pd.read_sql("select * from avengersdetails", mysql_connection)
print("Created Dataframe from mysql table")
print(df)
mysql_connection.close()
Output
Created Dataframe from mysql table
    ID    CharacterName            RealName
 0   1             Hulk        Mark Ruffalo
 1   2             Thor     Chris Hemsworth
 2   3      Black Widow  Scarlett Johansson
 3   4         Iron Man    Robert Downey Jr
 4   5  Captain America         Chris Evans
5. Load Mongodb collection as dataframe

To load the MongoDB collection data as a data frame we need pymongo library. you can install using the below command

pip install pymongo

Once you installed the pymongo in your system. you need to create the MongoDB connection object. After that, you need to convert MongoDB to pandas data frame

For connecting python with MongoDB refer this
https://beginnersbug.com/python-with-mongodb/

import pandas as pd
import pymongo

mongodb_connection = pymongo.MongoClient("mongodb://localhost:27017/")
mongodb_db = mongodb_connection["avengers"]
mongodb_avengers = mongodb_db["avengersdetails"].find()
df_mongodb_avengers = pd.DataFrame(list(mongodb_avengers))
print("Created Dataframe from mongodb collections")
print(df_mongodb_avengers)
Output
Created Dataframe from mongodb collections
                         _id ID   Character Name           Real Name
 0  5fd0e603549a851a24a48c36  1             Hulk        Mark Ruffalo
 1  5fd0e603549a851a24a48c37  2             Thor     Chris Hemsworth
 2  5fd0e603549a851a24a48c38  3      Black Widow  Scarlett Johansson
 3  5fd0e603549a851a24a48c39  4         Iron Man    Robert Downey Jr
 4  5fd0e603549a851a24a48c3a  5  Captain America         Chris Evans
Related Articles
Categories
pyspark

Subtracting dataframes in pyspark

In this post , let us learn about Subtracting dataframes in pyspark.

Creating dataframes in pyspark

We can create two dataframes using the below program for further use.

Sample program
from pyspark.sql import SparkSession
from pyspark import SparkContext
sc = SparkContext()
spark = SparkSession(sc)
from pyspark.sql import Row<br># Creating the first dataframe df
df=sc.parallelize([Row(name='Gokul',Class=10,level1=480,level2=380,level3=280,level4=520,grade='A'),Row(name='Usha',Class=12,level1=670,level2=720,level3=870,level4=920,grade='A'),Row(name='Rajesh',Class=12,level1=180,level2=560,level3=660,level4=850,grade='B')]).toDF()
print("Printing the dataframe df below")
df.show()<br># Creating the second dataframe df1
df1=sc.parallelize([Row(name='Usha',Class=12,level1=670,level2=720,level3=870,level4=920,grade='A'),Row(name='Kumar',Class=9,level1=320,level2=650,level3=760,level4=580,grade='C')]).toDF()
print("Printing the dataframe df1 below")
df1.show()
Output
Printing the dataframe df below
+-----+-----+------+------+------+------+------+
|Class|grade|level1|level2|level3|level4|  name|
+-----+-----+------+------+------+------+------+
|   10|    A|   480|   380|   280|   520| Gokul|
|   12|    A|   670|   720|   870|   920|  Usha|
|   12|    B|   180|   560|   660|   850|Rajesh|
+-----+-----+------+------+------+------+------+
Printing the dataframe df1 below
+-----+-----+------+------+------+------+-----+
|Class|grade|level1|level2|level3|level4| name|
+-----+-----+------+------+------+------+-----+
|   12|    A|   670|   720|   870|   920| Usha|
|    9|    C|   320|   650|   760|   580|Kumar|
+-----+-----+------+------+------+------+-----+
Subtracting dataframes

The keyword subtract helps us in subtracting dataframes in pyspark.

In the below program, the first dataframe is subtracted with the second dataframe.

#Subtracting dataframes in pyspark
df2=df.subtract(df1)
print("Printing the dataframe df2 below")
df2.show()
Printing the dataframe df2 below
+-----+-----+------+------+------+------+------+
|Class|grade|level1|level2|level3|level4|  name|
+-----+-----+------+------+------+------+------+
|   10|    A|   480|   380|   280|   520| Gokul|
|   12|    B|   180|   560|   660|   850|Rajesh|
+-----+-----+------+------+------+------+------+

We can subtract the dataframes based on few columns also.

#Subtracting dataframes based on few columns
df3=df.select('Class','grade','level1').subtract(df1.select('Class','grade','level1'))
print("Printing the dataframe df3 below ")
df3.show()
Printing the dataframe df3 below
+-----+-----+------+
|Class|grade|level1|
+-----+-----+------+
|   10|    A|   480|
|   12|    B|   180|
+-----+-----+------+
Reference

http://spark.apache.org/docs/latest/api/python/pyspark.html?highlight=subtract#pyspark.RDD.subtract

Categories
pyspark

spark SQL operation in pyspark

In this post, let us look into the spark SQL operation in pyspark with example.

What is spark SQL in pyspark ?

Spark SQL helps us to execute SQL queries. We can store a dataframe as table using the function createOrReplaceTempView.

Sample program

In the following sample program, we are creating an RDD using parallelize method and later converting it into dataframe.

To understand the process of creating dataframes better, Please refer to the below link.

createOrReplaceTempView helps us to register the dataframe created as temporary table.

We can execute all the SQL queries with the help of spark SQL operation in pyspark.

#Libraries required
from pyspark.sql import SparkSession
from pyspark import SparkContext
sc = SparkContext()
spark = SparkSession(sc)
from pyspark.sql import Row
#creating rdd and converting to dataframe
df=sc.parallelize([Row(name='Gokul',Class=10,marks=480,grade='A'),Row(name='Usha',Class=12,marks=450,grade='A'),Row(name='Rajesh',Class=12,marks=430,grade='B')]).toDF()
#Registering temporary table with create dataframedf.createOrReplaceTempView("df_view")
#Executing SQl queries using spark SQl operation
spark.sql("select * from df_view").show()
Output

We can even manipulate the data by filtering based on some conditions using where clause.

But Below is the entire data of the dataframe without any filteration and modification.

+-----+-----+-----+------+
|Class|grade|marks|  name|
+-----+-----+-----+------+
|   10|    A|  480| Gokul|
|   12|    A|  450|  Usha|
|   12|    B|  430|Rajesh|
+-----+-----+-----+------+
Reference

https://stackoverflow.com/questions/32788387/pipelinedrdd-object-has-no-attribute-todf-in-pyspark

Categories
pyspark

rank and dense rank in pyspark dataframe

In this post, Let us know rank and dense rank in pyspark dataframe using window function with examples.

Rank and dense rank

The rank and dense rank in pyspark dataframe help us to rank the records based on a particular column.

This works in a similar manner as the row number function .To understand the row number function in better, please refer below link.

The row number function will work well on the columns having non-unique values . Whereas rank and dense rank help us to deal with the unique values.

Sample program – creating dataframe

We could create the dataframe containing the salary details of some employees from different departments using the below program.

from pyspark.sql import Row
# Creating dictionary with employee and their salary details 
dict1=[{"Emp_id" : 123 , "Dep_name" : "Computer"  , "Salary" : 2500 } , {"Emp_id" : 456 ,"Dep_name"  :"Economy" , "Salary" : 4500} , {"Emp_id" : 789 , "Dep_name" : "Economy" , "Salary" : 7200 } , {"Emp_id" : 564 , "Dep_name" : "Computer" , "Salary" : 1400 } , {"Emp_id" : 987 , "Dep_name" : "History" , "Salary" : 3450 }, {"Emp_id" :678 , "Dep_name" :"Economy" ,"Salary": 4500},{"Emp_id" : 943 , "Dep_name" : "Computer" , "Salary" : 3200 }]
# Creating RDD from the dictionary created above
rdd1=sc.parallelize(dict1)
# Converting RDD to dataframe
df1=rdd1.toDF()
print("Printing the dataframe df1")
df1.show()
Printing the dataframe df1
+--------+------+------+
|Dep_name|Emp_id|Salary|
+--------+------+------+
|Computer|   123|  2500|
| Economy|   456|  4500|
| Economy|   789|  7200|
|Computer|   564|  1400|
| History|   987|  3450|
| Economy|   678|  4500|
|Computer|   943|  3200|
+--------+------+------+
Sample program – rank()

In order to use the rank and dense rank in our program, we require below libraries.

from pyspark.sql import Window
from pyspark.sql.functions import rank,dense_rank

from pyspark.sql import Window
from pyspark.sql.functions import rank
df2=df1.withColumn("rank",rank().over(Window.partitionBy("Dep_name").orderBy("Salary")))
print("Printing the dataframe df2")
df2.show()

In the below output, the department economy contains two employees with the first rank. This is because of the same salary being provided for both employees.

But instead of assigning the next salary with the second rank, it is assigned with the third rank. This is how the rank function will work by skipping the ranking order.

Printing the dataframe df2
+--------+------+------+----+
|Dep_name|Emp_id|Salary|rank|
+--------+------+------+----+
|Computer|   564|  1400|   1|
|Computer|   123|  2500|   2|
|Computer|   943|  3200|   3|
| History|   987|  3450|   1|
| Economy|   456|  4500|   1|
| Economy|   678|  4500|   1|
| Economy|   789|  7200|   3|
+--------+------+------+----+
Sample program – dense rank()

In the dense rank, we can skip the ranking order . For the same scenario discussed earlier, the second rank is assigned in this case instead of skipping the sequence order. 

from pyspark.sql import Window
from pyspark.sql.functions import dense_rank
df3=df1.withColumn("denserank",dense_rank().over(Window.partitionBy("Dep_name").orderBy("Salary")))
print("Printing the dataframe df3")
df3.show()
Printing the dataframe df3
+--------+------+------+---------+
|Dep_name|Emp_id|Salary|denserank|
+--------+------+------+---------+
|Computer|   564|  1400|        1|
|Computer|   123|  2500|        2|
|Computer|   943|  3200|        3|
| History|   987|  3450|        1|
| Economy|   456|  4500|        1|
| Economy|   678|  4500|        1|
| Economy|   789|  7200|        2|
+--------+------+------+---------+
Reference

http://spark.apache.org/docs/latest/api/python/pyspark.sql.html?highlight=window#pyspark.sql.Column.over

Categories
pyspark

row_number in pyspark dataframe

In this post, we will learn to use row_number in pyspark dataframe with examples.

What is row_number ?

This row_number in pyspark dataframe will assign consecutive numbering over a set of rows.
The window function in pyspark dataframe helps us to achieve it.
To get to know more about window function, Please refer to the below link.

Creating dataframe 

Before moving into the concept, Let us create a dataframe using the below program.

from pyspark.sql import Row
# Creating dictionary with employee and their salary details 
dict1=[{"Emp_id" : 123 , "Dep_name" : "Computer"  , "Salary" : 2500 } , {"Emp_id" : 456 ,"Dep_name"  :"Economy" , "Salary" : 4500} , {"Emp_id" : 789 , "Dep_name" : "Economy" , "Salary" : 7200 } , {"Emp_id" : 564 , "Dep_name" : "Computer" , "Salary" : 1400 } , {"Emp_id" : 987 , "Dep_name" : "History" , "Salary" : 3450 }, {"Emp_id" :678 , "Dep_name" :"Economy" ,"Salary": 6700},{"Emp_id" : 943 , "Dep_name" : "Computer" , "Salary" : 3200 }]
# Creating RDD from the dictionary created above
rdd1=sc.parallelize(dict1)
# Converting RDD to dataframe
df1=rdd1.toDF()
print("Printing the dataframe df1")
df1.show()

Thus we created the below dataframe with the salary details of some employees from various departments.

Printing the dataframe df1
+--------+------+------+
|Dep_name|Emp_id|Salary|
+--------+------+------+
|Computer|   123|  2500|
| Economy|   456|  4500|
| Economy|   789|  7200|
|Computer|   564|  1400|
| History|   987|  3450|
| Economy|   678|  6700|
|Computer|   943|  3200|
+--------+------+------+
Sample program – row_number

With the below segment of the code, we can populate the row number based on the Salary for each department separately.

We need to import the following libraries before using the window and row_number in the code.

orderBy clause is used for sorting the values before generating the row number.

from pyspark.sql import Window
from pyspark.sql.functions import row_number
df2=df1.withColumn("row_num",row_number().over(Window.partitionBy("Dep_name").orderBy("Salary")))
print("Printing the dataframe df2")
df2.show()
Printing the dataframe df2
+--------+------+------+-------+
|Dep_name|Emp_id|Salary|row_num|
+--------+------+------+-------+
|Computer|   564|  1400|      1|
|Computer|   123|  2500|      2|
|Computer|   943|  3200|      3|
| History|   987|  3450|      1|
| Economy|   456|  4500|      1|
| Economy|   678|  6700|      2|
| Economy|   789|  7200|      3|
+--------+------+------+-------+
Reference

https://spark.apache.org/docs/2.1.0/api/python/pyspark.sql.html#pyspark.sql.functions.row_number

Categories
pyspark

Left-anti and Left-semi join in pyspark

In this post, We will learn about Left-anti and Left-semi join in pyspark dataframe with examples.

Sample program for creating dataframes

Let us start with the creation of two dataframes . After that we will move into the concept of Left-anti and Left-semi join in pyspark dataframe.

# Creating two dictionaries with Employee and Department details
dict=[{"Emp_id" : 123 , "Emp_name" : "Raja" },{"Emp_id" : 234 , "Emp_name" : "Sindu"},{"Emp_id" : 456 , "Emp_name" : "Ravi"}]
dict1=[{"Emp_id" : 123 , "Dep_name" : "Computer" } , {"Emp_id" : 456 ,"Dep_name"  :"Economy"} , {"Emp_id" : 789 , "Dep_name" : "History"}]
# Creating RDDs from the above dictionaries using parallelize method
rdd=sc.parallelize(dict)
rdd1=sc.parallelize(dict1)
# Converting RDDs to dataframes 
df=rdd.toDF()
df1=rdd1.toDF()
print("Printing the first dataframe")
df.show()
print("Printing the second dataframe")
df1.show()
Printing the first dataframe
+------+--------+
|Emp_id|Emp_name|
+------+--------+
|   123|    Raja|
|   234|   Sindu|
|   456|    Ravi|
+------+--------+
Printing the second dataframe
+--------+------+
|Dep_name|Emp_id|
+--------+------+
|Computer|   123|
| Economy|   456|
| History|   789|
+--------+------+
What is Left-anti join ?

In order to return only the records available in the left dataframe . For those does not have the matching records in the right dataframe, We can use this join.

We could even see in the below sample program . Only the columns from the left dataframe will be available in Left-anti and Left-semi . And not all  the columns from both the dataframes as in other types of joins.

Sample program – Left-anti join

Emp_id: 234 is only available in the left dataframe and not in the right dataframe.

# Left-anti join between the two dataframes df and df1 based on the column Emp_id
df2=df.join(df1,['Emp_id'], how = 'left_anti')
print("Printing the result of left-anti below")
df2.show()
Printing the result of left-anti below
+------+--------+
|Emp_id|Emp_name|
+------+--------+
|   234|   Sindu|
+------+--------+
What is Left-semi join?

The common factors between the two dataframes is listed down in this join.

In the below sample program, two Emp_ids -123,456 are available in both the dataframes and so they picked up here.

Sample program – Left-semi join
# Left-semi join between two dataframes df and df1
df3=df.join(df1,['Emp_id'], how = 'left_semi')
print("Printing the result of left-semi below")
df3.show()
Printing the result of left-semi below
+------+--------+
|Emp_id|Emp_name|
+------+--------+
|   123|    Raja|
|   456|    Ravi|
+------+--------+

Other types of join are outer join  and inner join in pyspark 

Reference

https://spark.apache.org/docs/latest/api/python/pyspark.sql.html?highlight=join#pyspark.sql.DataFrame.join

Categories
pyspark

Outer join in pyspark dataframe with example

In this post , we will learn about outer join in pyspark dataframe with example .

If you want to learn Inner join refer below URL

There are other types of joins like inner join , left-anti join and left semi join

What you will learn

At the end of this tutorial, you will learn Outer join in pyspark dataframe with example

Types of outer join

Types of outer join in pyspark dataframe are as follows :

  • Right outer join / Right join 
  • Left outer join / Left join
  • Full outer join /Outer join / Full join 
Sample program for creating two dataframes

We will start with the creation of two dataframes before moving into the topic of outer join in pyspark dataframe .

#Creating dictionaries
dict=[{"Emp_id" : 123 , "Emp_name" : "Raja" },{"Emp_id" : 234 , "Emp_name" : "Sindu"},{"Emp_id" : 456 , "Emp_name" : "Ravi"}]
dict1=[{"Emp_id" : 123 , "Dep_name" : "Computer" } , {"Emp_id" : 456 ,"Dep_name"  :"Economy"} , {"Emp_id" : 789 , "Dep_name" : "History"}]
# Creating RDDs from the above dictionaries using parallelize method
rdd=sc.parallelize(dict)
rdd1=sc.parallelize(dict1)
# Converting RDDs to dataframes 
df=rdd.toDF()
df1=rdd1.toDF()
print("Printing the first dataframe")
df.show()
print("Printing the second dataframe")
df1.show()
Printing the first dataframe
+------+--------+
|Emp_id|Emp_name|
+------+--------+
|   123|    Raja|
|   234|   Sindu|
|   456|    Ravi|
+------+--------+
Printing the second dataframe
+--------+------+
|Dep_name|Emp_id|
+--------+------+
|Computer|   123|
| Economy|   456|
| History|   789|
+--------+------+
What is Right outer join ?

The Right outer join helps us to get the entire records from the right dataframe along with the matching records from the left dataframe .

And will be populated with null for the remaining unmatched columns of the left dataframe.

Sample program – Right outer join / Right join

Within the join syntax , the type of join to be performed will be mentioned as right_outer or right .

As Emp_name for Emp_id : 789 is not available in the left dataframe , it is populated with null in the following result .

# Right outer join / Right join 
df2=df.join(df1,['Emp_id'], how = 'right_outer')
print("Printing the result of right outer / right join")
df2.show()
# Printing the result of right outer / right join 
+------+--------+--------+
|Emp_id|Emp_name|Dep_name|
+------+--------+--------+
|   789|    null| History|
|   123|    Raja|Computer|
|   456|    Ravi| Economy|
+------+--------+--------+
What is Left outer join ?

This join is used to retrieve all the records from the left dataframe with its matching records from right dataframe .

The type of join is mentioned in either way as Left outer join or left join .

Sample program – Left outer join / Left join

In the below example , For the Emp_id : 234 , Dep_name is populated with null as there is no record for this Emp_id in the right dataframe .

# Left outer join / Left join <br />df3=df.join(df1,['Emp_id'], how = 'left_outer')
Print("Printing the result of Left outer join / Left join") 
 df3.show()
Printing the result of Left outer join / Left join
+------+--------+--------+
|Emp_id|Emp_name|Dep_name|
+------+--------+--------+
|   234|   Sindu|    null|
|   123|    Raja|Computer|
|   456|    Ravi| Economy|
+------+--------+--------+
What is Full outer join ?

Full outer join generate the result with all the records from both the dataframes . Null will populate in the columns for the unmatched records  .

Sample program – Full outer join / Full join / Outer join

All the Emp_ids from both the dataframes combined in this case with null population for unavailable values .

# Full outer join / Full join / Outer join
df4=df.join(df1,['Emp_id'], how = 'Full_outer')
print(Printing the result of Full outer join")
df4.show()
Printing the result of Full outer join
+------+--------+--------+
|Emp_id|Emp_name|Dep_name|
+------+--------+--------+
|   789|    null| History|
|   234|   Sindu|    null|
|   123|    Raja|Computer|
|   456|    Ravi| Economy|
+------+--------+--------+
Reference

https://spark.apache.org/docs/latest/api/python/reference/api/pyspark.sql.DataFrame.join.html?highlight=outer%20join

Categories
pyspark

Inner join in pyspark dataframe with example

In this post, We will learn about Inner join in pyspark dataframe with example. 

Types of join in pyspark dataframe

Before proceeding with the post, we will get familiar with the types of join available in pyspark dataframe.

Types  of join: inner join, cross join, outer join, full join, full_outer join, left join, left_outer join, right join, right_outer join, left_semi join, and left_anti join

What is Inner join ?

As similar to  SQL , Inner join helps us to get the matching records between two datasets . To understand it better , we will create two dataframes with the following piece of code .

Sample program for creating two dataframes
spark = SparkSession.builder.appName("Inner Join").getOrCreate()
from pyspark.sql import Row
# Creating dictionary with columns Emp_id and Emp_name
dict=[{"Emp_id" : 123 , "Emp_name" : "Raja" }, {"Emp_id" : 456 , "Emp_name" : "Ravi"}]
# Creating RDD from the above dictionary using parallelize method
rdd=sc.parallelize(dict)
# Converting RDD to dataframe 
df=rdd.toDF()
print("Printing the first dataframe df")
df.show()
Printing the first dataframe df 
+------+--------+
|Emp_id|Emp_name|
+------+--------+
|   123|    Raja|
|   456|    Ravi|
+------+--------+
# Creating dictionary with columns Emp_id and Dep_name 
dict1=[{"Emp_id" : 123 , "Dep_name" : "Computer" } , {"Emp_id" : 456 ,"Dep_name"  :"Economy"} , {"Emp_id" : 789 , "Dep_name" : "History"}]
# Creating RDD from the above dictionary using parallelize method
rdd1=sc.parallelize(dict1)
# Converting RDD to dataframe  
df1=rdd1.toDF()
print("Printing the second dataframe df1")
df1.show()
Printing the second dataframe df1
+--------+------+
|Dep_name|Emp_id|
+--------+------+
|Computer|   123|
| Economy|   456|
| History|   789|
+--------+------+
How to do inner join ?

The syntax of join requires three parameters to be passed –

1) The dataframe to be joined with

2) Column to be checked for

3) Type of join to be do . 

By default , Inner join will be taken for the third parameter if no input is passed .

First method

Let us see the first method in understanding Inner join in pyspark dataframe with example.

# Inner joining the two dataframes df and df1 based on the column Emp_id 
df2=df.join(df1,['Emp_id'], how = 'inner')
print("Printing the dataframe df2")
df2.show()
Printing the dataframe df2
+------+--------+--------+
|Emp_id|Emp_name|Dep_name|
+------+--------+--------+
|   123|    Raja|Computer|
|   456|    Ravi| Economy|
+------+--------+--------+
Second method
# Inner joining the two dataframes df and df1 based on the column Emp_id with default join i.e inner join
df3=df.join(df1,['Emp_id'])
print("Printing the dataframe df3")
df3.show()
Printing the dataframe df3
+------+--------+--------+
|Emp_id|Emp_name|Dep_name|
+------+--------+--------+
|   123|    Raja|Computer|
|   456|    Ravi| Economy|
+------+--------+--------+
Reference

https://spark.apache.org/docs/latest/api/python/pyspark.sql.html?highlight=join#pyspark.sql.DataFrame.join

Categories
pyspark

renaming dataframe column in pyspark

In this post, we can learn about renaming dataframe column in pyspark.

Sample program

withColumn() used for creating a new column in a dataframe.

Whereas withColumnRenamed() can be used while renaming the columns .

Note : Underlined characters must need to be in Capital letter.

import findspark 
findspark.init() 
from pyspark import SparkContext,SparkConf 
from pyspark.sql import Row 
from pyspark.sql.functions import * 
sc=SparkContext.getOrCreate() 
#creating dataframe with three records
df=sc.parallelize([Row(name='Gokul',Class=10,marks=480,grade='A'),Row(name='Usha',Class=12,marks=450,grade='A'),Row(name='Rajesh',Class=12,marks=430,grade='B')]).toDF()
print("Printing df dataframe ")
df.show()
# Creating new column as Remarks
df1=df.withColumn("Remarks",lit('Good'))
print("Printing df1 dataframe")
df1.show()
#Renaming the column Remarks as Feedback
df2=df1.withColumnRenamed('Remarks','Feedback')
print("Printing df2 dataframe")
df2.show()
Output
Printing df dataframe 
+-----+-----+-----+------+
|Class|grade|marks|  name|
+-----+-----+-----+------+
|   10|    A|  480| Gokul|
|   12|    A|  450|  Usha|
|   12|    B|  430|Rajesh|
+-----+-----+-----+------+

Printing df1 dataframe
+-----+-----+-----+------+-------+
|Class|grade|marks|  name|Remarks|
+-----+-----+-----+------+-------+
|   10|    A|  480| Gokul|   Good|
|   12|    A|  450|  Usha|   Good|
|   12|    B|  430|Rajesh|   Good|
+-----+-----+-----+------+-------+

Printing df2 dataframe
+-----+-----+-----+------+--------+
|Class|grade|marks|  name|Feedback|
+-----+-----+-----+------+--------+
|   10|    A|  480| Gokul|    Good|
|   12|    A|  450|  Usha|    Good|
|   12|    B|  430|Rajesh|    Good|
+-----+-----+-----+------+--------+
printSchema()

This function printSchema() help us to view the schema of each dataframe.

df2.printSchema()
root
 |-- Class: long (nullable = true)
 |-- grade: string (nullable = true)
 |-- marks: long (nullable = true)
 |-- name: string (nullable = true)
 |-- Feedback: string (nullable = false)
Reference

https://spark.apache.org/docs/2.1.0/api/python/pyspark.sql.html#pyspark.sql.DataFrame.withColumnRenamed

Creating dataframes in pyspark using parallelize