Categories
Angular

lazy loading in angular

lazy loading in angular is one of the most important concept. You have to understand this while designing an enterprise level angular app

What is lazy loading ?

In single page application we will load all the components and required java script and css files in single shot

But this will take more time when we have more components and more dependencies.

In order to avoid this angular has cool feature which is called lazy loading. which will load required module on need basis

ngModule

ngModule will allow us to group the things together, Module is great way to organize an application

Every angular application will have one base module which is called appModule

@NgModule decorator will make class as module. which will come with declarations,providers,imports. Below is the sample module 

import { NgModule } from '@angular/core';
import { CommonModule } from '@angular/common';

import { LazyRoutingModule } from './lazy-routing.module';
import { LazyComponent } from 'src/app/lazy/lazy/lazy.component';
import { MaterialModule } from '../material/material.module';
import { MatTabsModule } from '@angular/material/tabs';
import {MatCardModule} from '@angular/material/card';
import { SampleComponent } from 'src/app/lazy/sample/sample/sample.component';
import {MatButtonModule} from '@angular/material/button';


@NgModule({
  declarations: [LazyComponent,SampleComponent],
  imports: [
    CommonModule,
    LazyRoutingModule,
    MaterialModule,
  ]
})
export class LazyModule { }

Lazy Loading Steps

  • Create new angular project
    • ng new lazy-example –routing
  • Create new component(HomeComponent)
    • ng new component home
  • Create new Component (LazyComponent)
    • ng new component lazy
  • Create new module(LazyModule)
    • ng new module lazy –routing

Below is the folder structure of our application

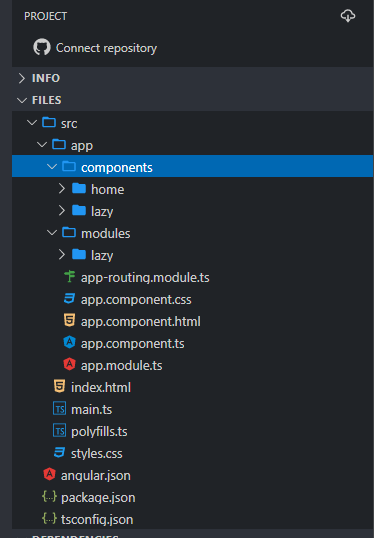
We have two components.& two Modules

  • AppModule is the base module used while application launch
  • LazyModule is the lazy module used while user clicks the lazy url
  • HomeComponent will get initialized while application launch via appModule
  • LazyComponent will get initialized while clicking the lazy routing url via LazyModule

Declare the HomeComponent in AppModule as like below

import { NgModule } from '@angular/core';
import { BrowserModule } from '@angular/platform-browser';
import { FormsModule } from '@angular/forms';
import { AppComponent } from './app.component';

import { BrowserAnimationsModule } from '@angular/platform-browser/animations';
import { AppRoutingModule } from './app-routing.module';
import { HomeComponent } from './components/home/home.component';

@NgModule({
  imports: [
    BrowserModule,
    FormsModule,
    AppRoutingModule,
    BrowserAnimationsModule
  ],
  declarations: [AppComponent, HomeComponent],
  bootstrap: [AppComponent]
})
export class AppModule {}

Declare the LazyComponent in LazyModule as like below

import { NgModule } from '@angular/core';
import { CommonModule } from '@angular/common';
import { LazyRoutingModule } from './lazy-routing.module';
import { MatTabsModule } from '@angular/material/tabs';
import { LazyComponent } from '../../components/lazy/lazy.component';

@NgModule({
  imports: [CommonModule, LazyRoutingModule, MatTabsModule],
  declarations: [LazyComponent]
})
export class LazyModule {}

The important point is routing. We have to mention that load children (LazyModule) in app-routing.module.ts

import { NgModule } from '@angular/core';
import { CommonModule } from '@angular/common';
import { RouterModule, Routes } from '@angular/router';
import { LazyModule } from './modules/lazy/lazy.module';
import { HomeComponent } from './components/home/home.component';

const routes: Routes = [
  { path: 'home', component: HomeComponent },
  { path: 'lazy', loadChildren: () => LazyModule }
];

@NgModule({
  imports: [RouterModule.forRoot(routes)],
  exports: [RouterModule],
  declarations: []
})
export class AppRoutingModule {}

As like app-routing we have to mention the home path in lazy-routing.module.ts file as like below

import { NgModule } from '@angular/core';
import { RouterModule, Routes } from '@angular/router';
import { LazyComponent } from '../../components/lazy/lazy.component';

const routes: Routes = [{ path: '', component: LazyComponent }];

@NgModule({
  imports: [RouterModule.forChild(routes)],
  declarations: []
})
export class LazyRoutingModule {}

That’s it you can see the output as like below
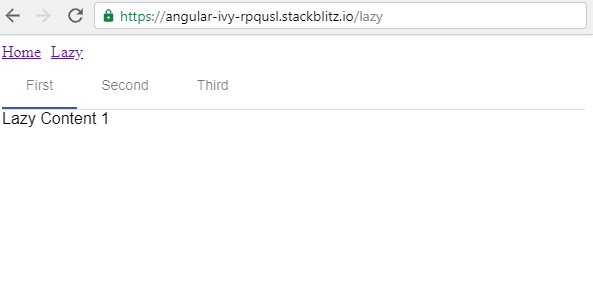
StackBlitz URL:

https://stackblitz.com/edit/angular-ivy-rpqusl?file=src/app/app.component.ts

Related Articles

Categories
ag-grid Angular

ag grid angular examples

In this post, we will see ag grid angular examples. ag grid is one of the most commonly used grid in modern web applications. It is easy to integrate with java script, angular. react ,vue.js.

It is available in both community & enterprise edition
https://www.ag-grid.com/documentation/

In this post we will learn to integrate the ag grid with angular. We are consider that you have a angular project already

Install ag grid in angular project

Run below commands to install ag grid in the angular project, Below will install the ag grid community version to your application

npm install --save ag-grid-community ag-grid-angular
npm install

app.module.ts

Add ag-grid module in app.module.ts as like below

import { BrowserModule } from '@angular/platform-browser';
import { NgModule } from '@angular/core';

import { AppComponent } from './app.component';
import { AgGridModule } from 'ag-grid-angular';

@NgModule({
  declarations: [AppComponent],
  imports: [
    BrowserModule,
    AgGridModule.withComponents([])
  ],
  providers: [],
  bootstrap: [AppComponent]
})
export class AppModule {}

Ag-grid Styling

ag-grid is coming with multiple styling and themes you have to add below code in the src/style.css file

@import "../node_modules/ag-grid-community/dist/styles/ag-grid.css";
@import "../node_modules/ag-grid-community/dist/styles/ag-theme-alpine.css";

Below are the providing themes in ag grid

  • ag-theme-alpine
    • @import “../node_modules/ag-grid-community/dist/styles/ag-theme-alpine.css”;
  • ag-theme-alpine-dark
    • @import “../node_modules/ag-grid-community/dist/styles/ag-theme-alpine-dark.css”;
  • ag-theme-balham
    • @import “../node_modules/ag-grid-community/dist/styles/ag-theme-balham.css”;
  • ag-theme-balham-dark
    • @import “../node_modules/ag-grid-community/dist/styles/ag-theme-balham-dark.css”
  • ag-theme-material
    • @import “../node_modules/ag-grid-community/dist/styles/ag-theme-material.css”

Adding grid in angular

We have to add column definition and row data in the component.ts file, Below is the snippet of app.component.ts

import { Component } from '@angular/core';

@Component({
  selector: 'app-root',
  templateUrl: './app.component.html',
  styleUrls: ['./app.component.css']
})
export class AppComponent {
  title = 'ag-custom';


  columnDefs = [
    { headerName: "Make", field: "make" ,resizable: true,filter: true  },
    { headerName: "Model", field: "model",resizable: true ,filter: true  },
    { headerName: "Price", field: "price",resizable: true ,filter: true  }
  ];

  rowData = [
    { make: "Toyota", model: "Celica", price: 35000 },
    { make: "Ford", model: "Mondeo", price: 32000 },
    { make: "Porsche", model: "Boxter", price: 72000 }
  ];

}

In the app.component.html file add the below snippet

<div>
  <ag-grid-angular style="width: 100%; height: 500px;" class="ag-theme-alpine" [rowData]="rowData"
    [columnDefs]="columnDefs">
  </ag-grid-angular>
</div>

Output

Github

https://github.com/rkumar9090/ag-grid

Categories
Angular

Interceptor in angular

Interceptor in angular will intercept each http request and response also error

Syntax

interface HttpInterceptor {
  intercept(req: HttpRequest<any>, next: HttpHandler): Observable<HttpEvent<any>>
}

CLI command to create interceptor

Once you created the angular application, naviagate to root folder and execute below command to create interceptor

ng g interceptor (name)

Now a class will be created as like below

import { Injectable } from '@angular/core';
import {
  HttpRequest,
  HttpHandler,
  HttpEvent,
  HttpInterceptor
} from '@angular/common/http';
import { Observable } from 'rxjs';

@Injectable()
export class MyappintercepInterceptor implements HttpInterceptor {

  constructor() {}

  intercept(request: HttpRequest<unknown>, next: HttpHandler): Observable<HttpEvent<unknown>> {
    return next.handle(request);
  }
}

The class should implement HttpInterceptor interface. The method intercept will handle the request and response

You should add this interceptor in your app module.ts file in the provider section as like below

import { BrowserModule } from '@angular/platform-browser';
import { NgModule } from '@angular/core';

import { AppRoutingModule } from './app-routing.module';
import { AppComponent } from './app.component';
import { AgGridModule } from 'ag-grid-angular';
import { HTTP_INTERCEPTORS } from '@angular/common/http';
import { MyappintercepInterceptor } from './myappintercep.interceptor';

@NgModule({
  declarations: [
    AppComponent
  ],
  imports: [
    BrowserModule,
    AgGridModule.withComponents([]),
    AppRoutingModule
  ],
  providers: [{provide: HTTP_INTERCEPTORS, useClass: MyappintercepInterceptor, multi: true }  ],
  bootstrap: [AppComponent]
})
export class AppModule { }

You have to clone the request to add token in the http request headers as like below

import { Injectable } from '@angular/core';
import {
  HttpRequest,
  HttpHandler,
  HttpEvent,
  HttpInterceptor
} from '@angular/common/http';
import { Observable } from 'rxjs';

@Injectable()
export class MyappintercepInterceptor implements HttpInterceptor {

  constructor() {}

  intercept(request: HttpRequest<unknown>, next: HttpHandler): Observable<HttpEvent<unknown>> {

    request = request.clone({
      setHeaders: {
        'apptoken': 'SYSTEM'
      }
    });
    
    return next.handle(request);
  }
}

Categories
Angular

pass value between two components using the route in angular

In this tutorial, we will learn about pass value between two components using the route in angular

In many scenarios, we need to pass one or two parameters from one component to another component

We can pass a value in various ways, But in this tutorial, we go to pass value between components using the route

For this tutorial, We are going to pass student id from the student list on click

By default, we will define routing as like below in-app-routing.module.ts

{ path: 'student', component: StudentDetailsComponent }

We need to pass id along with the student route like /student/1from the student list page

We can receive those route param value in student details page using ActivatedRoute

import { ActivatedRoute } from '@angular/router';
Sending value from first component

Here we are using pass value while clicking a hyperlink. via router link, we are defining the student id value as like below

<a [routerLink]="['/student', studentId]">{{name}} </a>
Routing Syntax

We need to mention in app.routing.module.ts about the parameter as like below
{ path: 'student/:id', component: StudentDetailsComponent }

app.routing.module.ts
import { NgModule } from '@angular/core';
import { Routes, RouterModule } from '@angular/router';
import { StudentDetailsComponent } from './component/student-details/student-details.component';


const routes: Routes = [
  { path: 'student/:id', component: StudentDetailsComponent }
];

@NgModule({
  imports: [RouterModule.forRoot(routes)],
  exports: [RouterModule]
})
export class AppRoutingModule { }
Receiving value in second component

As mentioned above we are going to use activedRoute to retrieve the value

this.studentId = this.activeParms.snapshot.paramMap.get("id");
Student-details-component.ts
import { Component, OnInit } from '@angular/core';
import { ActivatedRoute } from '@angular/router';

@Component({

  selector: 'app-student-details',
  templateUrl: './student-details.component.html',
  styleUrls: ['./student-details.component.css']
})
export class StudentDetailsComponent implements OnInit {

  constructor(private activeParms: ActivatedRoute) { }
  studentId: string;
  ngOnInit(): void {
    this.studentId = this.activeParms.snapshot.paramMap.get("id");
  }

}
Conclusion

In this post, we looked about to pass value between two components using the route in angular

Related Articles

https://beginnersbug.com/ng-if-else-condition-in-angular-with-example/

Categories
Angular

ng if else condition in angular with example

In this post, we will learn about ng if else condition in angular with example

NgIf the directive will be used to display DOM based on a condition. It is very useful to show or hide a HTML div

Sample Code
<div ngIf="show">
    <p>This is can be show</p>
</div>
import { Component, OnInit } from '@angular/core';
import { StudentService } from '../../service/student.service';
import { Student } from '../../model/student.model';

@Component({

  selector: 'app-student-details',
  templateUrl: './student-details.component.html',
  styleUrls: ['./student-details.component.css']
})
export class StudentDetailsComponent implements OnInit {

  constructor() { }

  show: boolean;

  ngOnInit(): void {   
    this.show=true;
  }

}

In the above example, we declared a boolean variable called as show. We are changing that boolean value to true on ngOnInit method

In the html file we are using that show boolean variable to display the paragraph tag

if the show boolean is false then the html div will not display

ngIf else Example

We need to define the else block inside a ng-template block. below is the example for ng if else condition

<div ngIf="show; else notshowing">
    <p>This is can be show</p>
</div>

<ng-template #notshowing>
    <p>This will be shown on else statment</p>
</ng-template>
Conclusion

In the above post, we learned about ngIf else condition in angular with example

Related Articles

http post request from angular with example

Categories
Angular

http post request from angular with example

In this post, we will learn to make http post request from angular with example

To communicate with backend server we are using HttpClient from @angular/common/http

Syntax
this.http.post<return-type>(url: string, body: any, options?);

In this example we are going to save a student details. To do that we need to invoke a http post method with student details

{  
  "firstname": "string", 
  "lastname": "string"
  "department": "string",
}

Now I am creating a model class for above json request like below

export class Student {    
    firstname: string;    
    lastname: string;
    department: string;
}

Now we need to create service class to make http post request from angular
creating service layer command:  ng g s student

import { Injectable } from '@angular/core';

@Injectable({
  providedIn: 'root'
})
export class StudentService {

  constructor() { }
  
}

Now we can create saveStudent method to save the student details in back end

 /**
   * In this method we are calling http post method 
   * @param student 
   */
  saveStudentDetails(student: Student): Observable<any>{
    return this.http.post<any>('http://localhost:8080/api/student',student);
  }
Student Service layer
import { Injectable } from '@angular/core';
import { HttpClient } from '@angular/common/http';
import { Observable } from 'rxjs';
import { Student } from '../model/student.model';
@Injectable({
  providedIn: 'root'
})
export class StudentService {

  constructor(private http: HttpClient) { }


  /**
   * In this method we are calling http post method 
   * @param student 
   */
  saveStudentDetails(student: Student): Observable<any>{
    return this.http.post<any>('http://localhost:8080/api/student',student);
  }
  
}

Now we can call this service class method from component, For example I am creating a simple form and component as like below

import { Component, OnInit } from '@angular/core';
import { StudentService } from '../../service/student.service';
import { Student } from '../../model/student.model';

@Component({

  selector: 'app-student-details',
  templateUrl: './student-details.component.html',
  styleUrls: ['./student-details.component.css']
})
export class StudentDetailsComponent implements OnInit {

  constructor(private studentService: StudentService) { }

  student: Student=null;

  ngOnInit(): void {   

  }

  saveStudent(){
    //Creating model class
    this.student.firstname="Beginners";
    this.student.lastname="Bug";
    this.student.department="Blooggin";
    
    //Call service layer from component 
    this.studentService.saveStudentDetails(this.student).subscribe(data=>{
      console.log("Student Added successfully");
    
    },error=>{
      console.log("There was some error ",error);
    });

  }

}
<form (ngSubmit)="saveStudent()">
<label>FirstName:</label> <br/><input type="text" name="firstname" placeholder="Enter First name"><br/>
<label>LastName:</label> <br/><input type="text" name="lastname" placeholder="Enter Last name"><br/>
<label>Department:</label> <br/><input type="text" name="department" placeholder="Enter Department"><br/><br/>
<button class="button" type="submit">Add</button>

</form>
Conclusion

We learned to make http post request from angular with example

Related Articles

call http rest service from angular

Categories
Angular

call http rest service from angular

In this tutorial, we will learn to call http rest service from angular

To understand this tutorial we should know the angular basics like components, service

Before starting we should have a component & service knowledge, Here we are going to use appcomponent as component and going to create a service to call http service

Navigate to src/app from vs code terminal, Execute below command to create service

ng g s app-service

app-service.service.ts & app-service.service.spec.ts will get created in src/app folder

C:\Users\Admin\angular-demo\src\app>ng g s app-service
CREATE src/app/app-service.service.spec.ts (378 bytes)
CREATE src/app/app-service.service.ts (139 bytes)

C:\Users\Admin\angular-demo\src\app>

Now open the app-service.ts file

import { Injectable } from '@angular/core';

@Injectable({
  providedIn: 'root'
})
export class AppServiceService {

  constructor() { }
}
Http Endpoint details

For this tutorial, I have created a endpoint which return student details

http://localhost:8080/api/student
Output Json
[
  {
    "id": 1,
    "department": "ECE",
    "firstname": "rajesh",
    "lastname": "kumar"
  }
]

Create a student model class to map the HTTP Response

student.model.ts

export class Student {
    department: string;
    firstname: string;
    id: number;
    lastname: string;
}

create a method to invoke http call. We are using HttpClient from @angular/common/http

import { Injectable } from '@angular/core';
import { HttpClient } from '@angular/common/http';
import { Observable } from 'rxjs';
import { Student } from './model/student.model';


@Injectable({
  providedIn: 'root'
})
export class AppServiceService {

  constructor(private http: HttpClient) { }

  getStudentDetails(): Observable<Student[]>{
    return this.http.get<Student[]>('http://localhost:8080/api/student');

  }

}

Now call the getStudentDetails() method from app.component.ts on ngOnInit

  ngOnInit(): void {
    this.appService.getStudentDetails().subscribe(data => {
      this.studentDetails=data;
    });

Below is the complete app.component.ts

import { Component } from '@angular/core';
import { AppServiceService } from './app-service.service';
import { Student } from './model/student.model';

@Component({
  selector: 'app-root',
  templateUrl: './app.component.html',
  styleUrls: ['./app.component.css']
})
export class AppComponent {
  
  title = 'angular-demo';

  constructor(private appService: AppServiceService) { }

   studentDetails: Student[];

  ngOnInit(): void {
    this.appService.getStudentDetails().subscribe(data => {
      this.studentDetails=data;
    });

  }
}

You can map this StudentDetails to your html as like below

<div *ngIf="studentDetails">
    <table>
        <thead>
            <tr>
                <td>ID</td>
                <td>FirstName</td>
                <td>LastName</td>
                <td>Department</td>
            </tr>
        </thead>
        <tbody>
            <tr *ngFor="let response of studentDetails">
                <td>
                    {{response.id}}
                </td>
                <td>
                    {{response.department}}
                </td>
                <td>
                    {{response.firstname}}
                </td>
                <td>
                    {{response.lastname}}
                </td>
            </tr>

        </tbody>

    </table>

</div>
<router-outlet></router-outlet>
Conclusion

I this post we learned to call http rest service from angular

Github

https://github.com/rkumar9090/angular-demo/blob/master/src/app/app-service.service.ts