Categories
spark

spark local and standalone mode

In this post , let us have a look at spark local and standalone mode .

Local mode

Other than the local and standalone mode which we are going to see in this post , we do have few other deployment mode  as well .

Local Mode is the default mode of spark which runs everything on the same machine.

In the case of not mentioning –master flag to the command whether spark-shell or spark-submit , ideally it means it is running in local mode.

Other way is to pass –master option with local as argument which defaults to 1 thread. 

We can even increase the number of threads by providing the required number within the square bracket . For instance , spark-shell –master local[2] .

By using asterisks instead like local[*] we can use as many threads as the number of processors available to the Java virtual machine.

spark-submit --class <class name> --master local[8] <jar file>

Standalone mode

  • Spark standalone cluster in client deploy mode
  • Spark standalone cluster in cluster deploy mode with supervise
  • Run a Python application on a Spark standalone cluster
Spark standalone cluster in client deploy mode

Application will submit on the gateway machine which is interlinked with any other worker machines physically . The input and output of the application is attached to the console . And so this mode well suite for the application which include REPL (i.e Spark shell) .In client mode, the driver launches directly within the spark-submit process which acts as a client to the cluster.

spark-submit --class <class name> --master <spark://host id> --executor-memory 20G --total-executor-cores 100 <jar name> 
Spark standalone cluster in cluster deploy mode with supervise

For a Spark standalone cluster with cluster deploy mode, you can also provide –supervise.  The driver restarts automatically incase of any kind of failures with a non-zero exit code.

Few applications will submit from a machine far from the local machine . It is common to use cluster mode to minimize network latency between the drivers and the executors.

spark-submit --class <class name> --master <spark://host id> --deploy-mode cluster --supervise --executor-memory 20G --total-executor-cores 100 <jar name>
Run a Python application on a Spark standalone cluster

Currently, the standalone mode does not support cluster mode for Python applications.

spark-submit --master <spark:host id> <python file>

Reference

https://spark.apache.org/docs/latest/submitting-applications.html
Categories
spark

spark client and cluster mode

In this post , let us learn about the spark client and cluster mode .

Where should we use ?

spark submit options will require master and deployment mode related information .

For YARN cluster manager , master will be YARN and deploy mode will vary depends on the requirement .

spark-submit --master <master-url> --deploy-mode <deploy-mode> -- <other options >

What is Driver program ?

Before getting into the topic , let us get to know about the driver program . When a user submit any spark job , the very first step will be the driver program triggers . This plays a prominent role in controlling the  executors in worker nodes .

What are the main types of deployment modes in YARN ?

Based on where actually the driver program triggers , we can differentiate the types of modes . The YARN client mode is the default mode . 

  • YARN client mode
  • YARN cluster mode

Client mode

In this client mode , the driver program launches on the same edge node where the spark job is submitted . This driver program utilizes the resources like memory and CPU from the same machine where we submit the job .

If multiple number of jobs try to use the client mode , we might encounter out of memory issue because of over utilization of resources . And so it is better to use the client mode only for development and debugging purposes . It supports Spark shell as well.

spark-submit --master yarn --deploy-mode client --driver-memory 4g --executor-memory 2g --executor-cores 1 --num-executors 5 

Cluster mode

The driver program launches on any other worker node except the edge node on which spark job submitted. One disadvantage is that it does not support Spark shell .

We can run multiple jobs using the cluster mode simultaneously without any trouble . For this reason , the cluster mode is used whenever we are deploying in production .

spark-submit --master yarn --deploy-mode cluster --driver-memory 4g --executor-memory 2g --executor-cores 1 --num-executors 5 

Any common features between client and cluster mode ?

Yes , We do have few common characteristics among both client and cluster mode  . 

1. Application Master – request the resources
2. Executors are initiated by – YARN Nodemanagers
3. Other persistent services by – YARN Nodemanagers and YARN Resourcemanager

Reference

https://spark.apache.org/docs/latest/running-on-yarn.html

Categories
Go

install go lang in windows

In this article, We will learn to install go lang in windows

GO lang is created by Google in 2007. It is the most prominent language now. It is easy to build fast and scale massive application

It is an open-source programming language supported by Google. Most of the cloud providers like google cloud, AWS, azure are supporting go lang in their ecosystem

Download MSI package

  1. Navigate to the this URL https://go.dev/doc/install 
  2. Click on the Download Go for Windows as like with below image 
  3. Now your download will get start automatically and ready to install
  4. Click on the downloaded .msi file
  5. Click on the next button on the installer prompt 
  6. Click the next for the consequtive steps.
  7. Once you installed you will get below screen in the installer prompt 

Verify the installation

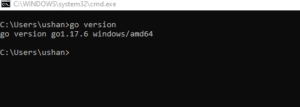
Once you finished the installation you can verify the go lang via command prompt
Open the command prompt and run this command

go version

Categories
spark

createTempView and createGlobalTempView

In this post , let us learn the difference between createTempView and createGlobalTempView

createOrReplaceTempView

In Spark 2.0 , createOrReplaceTempView came into picture to replace registerTempTable. It creates or replaces an in-memory reference to the Dataframe in the form of local temporary view . Lifetime of this view is dependent to SparkSession class .

df=spark.sql("select * from table")
df.createOrReplaceTempView("ViewName")

Both createOrReplaceTempView and createTempView used for creating temporary view from the existing dataframe .

If the view already exists createOrReplaceTempView replace the existing view with the new one . Wheareas  ‘already exists’ exception will be thrown for createTempView.

The following command is used for dropping the view . One another way to make the view out of scope is by shuttingdown the session using stop()

spark.catalog.dropTempView("ViewName")

Libraries required :

pyspark.sql.DataFrame.createOrReplaceTempView
pyspark.sql.DataFrame.createTempView
pyspark.sql.Catalog.dropTempView

createOrReplaceGlobalTempView

It creates references in the form of global temporary view which used across spark sessions. Life time of this view is dependent to spark application itself

df=spark.sql("select * from table")
df.createOrReplaceGlobalTempView("ViewName")

Following is the command to drop the view , or can stop() the session

spark.catalog.dropGlobalTempView("ViewName")

Libraries required

pyspark.sql.DataFrame.createOrReplaceGlobalTempView
pyspark.sql.DataFrame.createGlobalTempView
pyspark.sql.Catalog.dropGlobalTempView

Inorder to get more information on the difference between createTempView and createGlobalTempView , please refer the below URL https://spark.apache.org/docs/latest/api/python/reference/api/pyspark.sql.DataFrame.createGlobalTempView.html

Categories
spark

spark executor memory and cores

In this post let us discuss on the spark executor memory and cores .

Factors need to consider while calculating

spark submit configuration parameters include number of executors , executor core and executor memory . Determining values for the same include set of calculations and depends on few factors which we would see below.

Hadoop/OS Deamons : NameNode, Secondary NameNode, DataNode, JobTracker and TaskTracker are the daemons running in background while spark application run through cluster manager like yarn . We need to allocate few cores for these daemons as well which is approximately of about 1 core per node.

Yarn ApplicationMaster (AM): This will get the enough resources from the ResourceManager and work along with the NodeManagers to execute and monitor the containers and their resource consumption.It would need (~1024MB and 1 Executor).

HDFS Throughput: HDFS client achieves full write throughput with ~5 tasks per executor whereas it faces difficulty with lot of concurrent threads. So it’s better to have the number of cores per executor lesser than 5.

MemoryOverhead:
Full memory requested to yarn per executor =
spark-executor-memory + spark.yarn.executor.memoryOverhead.

spark.yarn.executor.memoryOverhead =
Max(384MB, 7% of spark.executor-memory)

So, if we request 20GB per executor, AM will actually get 20GB + memoryOverhead = 20 + 7% of 20GB = ~23GB memory for us.

Cluster configuration

Will calculate number of executor , executor cores and executor memory for the following cluster Configuration :
10 Nodes
16 cores per Node
64GB RAM per Node

Running executors with too much memory often results in excessive garbage collection delays.
Whereas running tiny executors (with a single core and just enough memory needed to run a single task, for example) throws away the benefits that come from running multiple tasks in a single JVM.

Calculating values for parameters

1) To identify the number of available of cores within a cluster
Number of cores = available number of nodes in a cluster * number of cores per node
= 10 * 16
= 160 cores

2) Total memory = available number of nodes in a cluster * memory per node
= 10 * 64 GB
= 640 GB

3) Within the available number of cores 160 , one core per node needs to be allocated for deamons
Remaining cores after allocating one core per node for daemons = 160 – (1 * number of nodes )
= 160 – (1 * 10)
= 160 – 10
= 150 cores

4) Total executor = number of cores / 5(recommended concurrent threads for maximum throughput )
= 150 / 5
= 30

5) Executor per node = Total executor / number of nodes
= 30 / 10
= 3

6) Memory per executor = Total memory / Total executor
= 640 GB / 30
= 21 GB

7) MemoryOverhead = Max(384MB, 7% of spark.executor-memory)
= Max(384MB, 7% 21GB)
= Max(384MB, 1.47 GB)
= ~2 GB

8) Final Executor memory = Memory per executor – memory overhead
= 21 – 2
= 19 GB

9) Remaining executors = Total executor – One executor for Application manager
= 30 – 1
= 29

So , the maximum value we can have for the configuration parameters is as follows

Executor memory – 19 GB 

Total available executors – 29

And for driver memory , we can have the same size as executor memory , I t dint require any specific calculation.

https://spoddutur.github.io/spark-notes/distribution_of_executors_cores_and_memory_for_spark_application.html

Categories
spark

RDD , Dataframe and Dataset in spark

In this post , let us learn about RDD , Dataframe and Dataset in spark

Resilient Distributed Datasets – RDD

RDD is the fundamental data structure in spark .

  • fault-tolerant
  • in memory
  • immutable distributed collection of elements
  • partitioned across nodes in the cluster and operate in parallel
  • low-level API that offers transformation and action

Two ways to create RDDs:

  1. Parallelizing an existing collection
  2. Referencing external storage system

Parallelizing an existing collection:

val a = Array(1, 2, 3, 4)
val b = sc.parallelize(a)

Referencing external storage system:

Referenced external storage system such as a shared filesystem, HDFS, HBase, or any data source offering a Hadoop InputFormat .
Text file RDDs created using SparkContext’s textFile method which takes a URI for the file (either a local path or a hdfs://, s3a://, etc) and reads it as a collection of lines. 

val c = sc.textFile("data.txt")

By default, Spark creates one partition for each block of the file (default block size in HDFS – 128MB).

We can even increase the partitions by passing a larger value as second argument to textFile method but cannot have fewer partitions than blocks.

Dataframe

A DataFrame is a Dataset organized into named columns , conceptually equivalent to a table in a relational database or a data frame in R/Python, but with richer optimizations.

Dataframes created from a wide array of sources such as: structured data files, tables in Hive, external databases, or existing RDDs.

The DataFrame API is available in Scala, Java, Python, and R. In Scala and Java, a DataFrame is represented by a Dataset of Rows. In the Scala API, DataFrame is simply a type alias of Dataset[Row]. While, in Java API, users need to use Dataset<Row> to represent a DataFrame.

Dataset

A Dataset is a distributed collection of data and a new interface added in Spark 1.6 that provides the benefits of RDDs (strong typing, ability to use powerful lambda functions) with the benefits of Spark SQL’s optimized execution engine.

A Dataset can be constructed from JVM objects and then manipulated using functional transformations (map, flatMap, filter, etc.).

The Dataset API is available in Scala and Java. Python does not have the support for the Dataset API. But due to Python’s dynamic nature, many of the benefits of the Dataset API are already available (i.e. you can access the field of a row by name naturally row.columnName). The case for R is similar.

RDDs and Datasets are type safe means that compiler know the Columns and it’s data type of the Column whether it is Long, String, etc…. But, In Dataframe, every time when you call an action, collect() for instance,then it will return the result as an Array of Rows not as Long, String data type.

Categories
hive

drop partition in hive

In this post let us learn how to drop partition in hive using examples

Partition in hive

Hive table can have one or multiple partition keys by which the query performance has been improved. By including the partition keys in our query , we can actually achieve the query optimization.

External and internal table in hive

Two types of tables available in hive are external and internal

For external tables , table properties need to be changed before dropping partitions .

alter table employee set tblproperties ('EXTERNAL'='FALSE');

Drop partition in hive

We can drop the respective partition of the external table using the following command .

ALTER TABLE employee set tblproperties ('EXTERNAL'='FALSE');
ALTER TABLE employee drop PARTITION (state='Bihar');
#After dropping the partition table properties should be reverted to external
ALTER TABLE employee set tblproperties ('EXTERNAL'='TRUE');

Resetting the location

We can even set the partition to the new location using the following command .  

ALTER TABLE employee PARTITION(state = 'Bihar', dep = 'accounts') 
SET LOCATION 'hdfs://retail/company/employee/accounts/Bihar

Dropping the range of partition in hive

For dropping range of data , we can try like below. 

ALTER TABLE employee DROP PARTITION (entry_date>'2021-03-14',entry_date<'2021-12-16');

Dropping all the partitions

Following one drop all the partitions

ALTER TABLE employee DROP if exists (state<>'');

Reference

https://cwiki.apache.org/confluence/display/hive/languagemanual+ddl#LanguageManualDDL-DropPartitions

Categories
excel file python

read excel file in python

In this tutorial, we will learn about read excel file in python using the pandas library.

In this example, we are using the pandas library to read an excel file.

Pandas is an open-source library that has a lot of features inbuilt. Here we are using it for reading the excel file.
For More refer to official docs of the pandas
https://pandas.pydata.org/
For our exercise, I am going to use the below excel file format.

Pandas Installtion

pip install pandas

Read excel example

# Using pandas library
import pandas as panda


class ReadExcel:
    # Main method
    if __name__ == "__main__":
        # file path of xlsx file
        file_path = "D://data/Avengers.xlsx"
        # reading the excel file
        excel = panda.read_excel(file_path)
        print(excel)

Output

   ID   Character Name           Real Name
0   1             Hulk        Mark Ruffalo
1   2             Thor     Chris Hemsworth
2   3      Black Widow  Scarlett Johansson
3   4         Iron Man    Robert Downey Jr
4   5  Captain America         Chris Evans

References

https://beginnersbug.com/create-dataframe-in-python-using-pandas/

Related Articles

Categories
mongodb python

python with mongodb

In this post, we will see about connecting Python with MongoDB.

MongoDB is a fast and reliable NO SQL database that is used to store the data in JSON structure.

PyMongo

Here we are using the PyMongo library to connect MongoDB from python. refer https://pymongo.readthedocs.io/en/stable/

We already installed MongoDB, RoboMongo & pyhcarm for our development

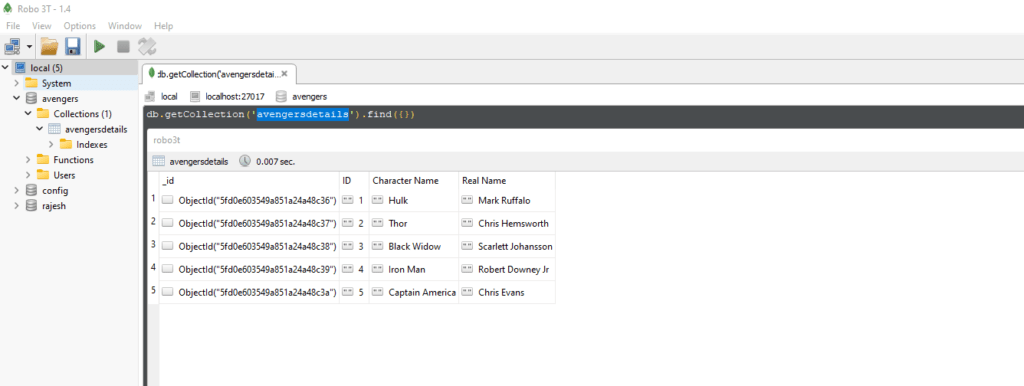
I have created a database called avengers which have a collection as avengersdetails as like below image

PyMongo

Command to install pymongo library

pip install pymongo

PyMongo Import

import pymongo

In our example, we are using the OOPS concept to create the connection and fetch the data from Mongo DB.
Below line is the starting point of the code

if __name__ == "__main__":

Python with MongoDB Example

import pymongo


class MongoDbConn:

    # __init__ method will be used to initialize the variable
    # We need to pass the mongo db url & database name to this method
    def __init__(self, host_url, database):
        self.host_details = host_url
        self.db_name = database

    # Once you create the object you can connect the connection object from below method
    def get_mongodb_connection_details(self) -> object:
        my_client = pymongo.MongoClient(self.host_details)
        my_db = my_client[self.db_name]
        return my_db


if __name__ == "__main__":
    # Create an object for our class MongoDbConn
    obj = MongoDbConn("mongodb://localhost:27017/", "avengers")
    # Create database connection from the below line
    db_connection = obj.get_mongodb_connection_details()
    # pass your collection(table) name in below line
    collection_details = db_connection["avengersdetails"]
    for data in collection_details.find():
        print(data)

Output

{'_id': ObjectId('5fd0e603549a851a24a48c36'), 'ID': '1', 'Character Name': 'Hulk', 'Real Name': 'Mark Ruffalo'}
{'_id': ObjectId('5fd0e603549a851a24a48c37'), 'ID': '2', 'Character Name': 'Thor', 'Real Name': 'Chris Hemsworth'}
{'_id': ObjectId('5fd0e603549a851a24a48c38'), 'ID': '3', 'Character Name': 'Black Widow', 'Real Name': 'Scarlett Johansson'}
{'_id': ObjectId('5fd0e603549a851a24a48c39'), 'ID': '4', 'Character Name': 'Iron Man', 'Real Name': 'Robert Downey Jr'}
{'_id': ObjectId('5fd0e603549a851a24a48c3a'), 'ID': '5', 'Character Name': 'Captain America', 'Real Name': 'Chris Evans'}

Related Articles

Categories
data structures insertion sort java

insertion sort algorithm

In this article, we will discuss the simple sorting algorithm called insertion sort.

What is insertion sort?

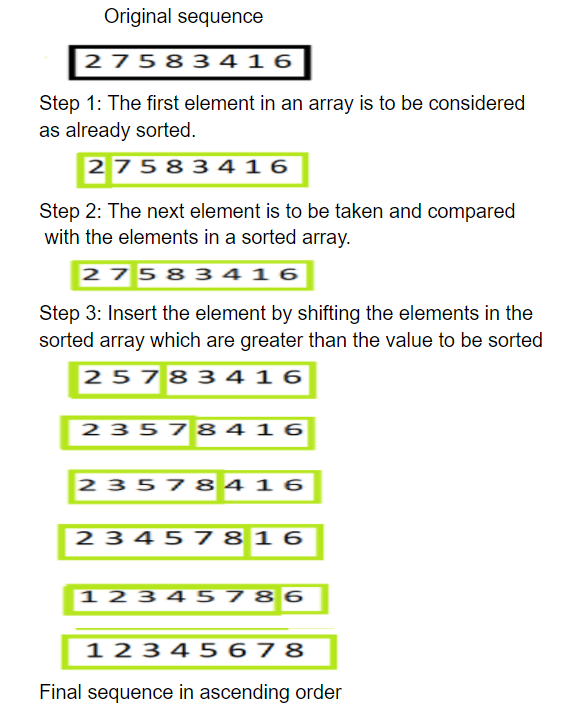
This works in a similar fashion as playing a deck of cards. Assuming two different parts – sorted and unsorted, we need to pick and sort each card from an unsorted part into a sorted part.

Steps to be folowed

The first element in an array is to be considered as already sorted.

The next element is to be taken and compared with the elements in a sorted array.

Insert the element by shifting the elements in the sorted array which are greater than the value to be sorted

Example

import java.util.Arrays;

public class InsertionSort {

	private void sortArray(int[] arr) {

		for (int i = 1; i < arr.length; i++) {
			int key = arr[i];
			int j = i - 1;
			while (j >= 0 && arr[j] > key) {
				arr[j + 1] = arr[j];
				j--;
			}
			arr[j + 1] = key;
		}

	}

	public static void main(String[] args) {
		InsertionSort insertionSort = new InsertionSort();
		int[] arr = { 2, 7, 5, 8, 3, 4, 1, 6 };
		insertionSort.sortArray(arr);
		System.out.println(Arrays.toString(arr));
	}

}

Output

[1, 2, 3, 4, 5, 6, 7, 8]

Related Articles