In this post, we will learn about the bubble sort algorithm. The bubble sort algorithm is one of the important sorting algorithms
It will compare two adjacent elements in an array and swap the right value to the left if it is lesser than left
Bubble Sort
Time Complexity: O(n^2)
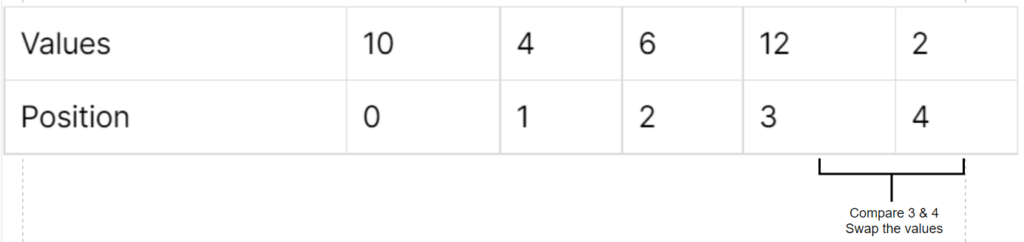
Values
10
12
4
6
2
Position
0
1
2
3
4
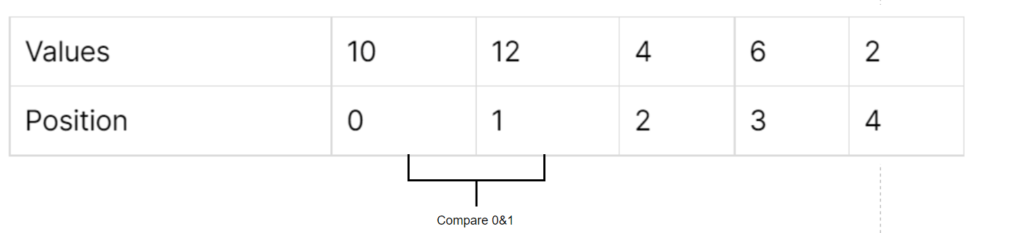
Input Array
Step 1
Iterate the given array using for loop
Step 2
Add one more iteration within the for loop again
Step 3
compare the first element with second element
Step 4
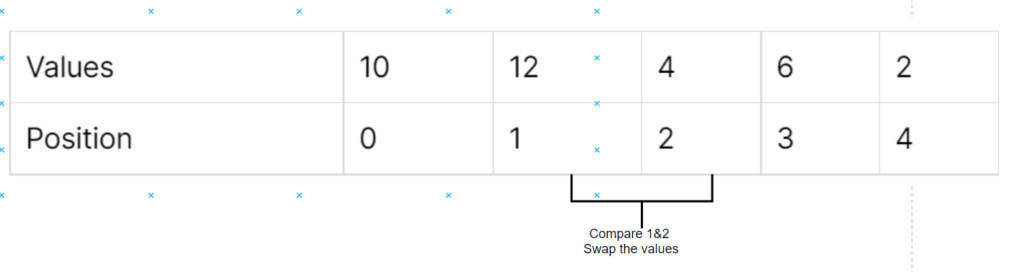
If first element greater than second element swap the two elements
Step 5
Compare the second element with third element
Step 6
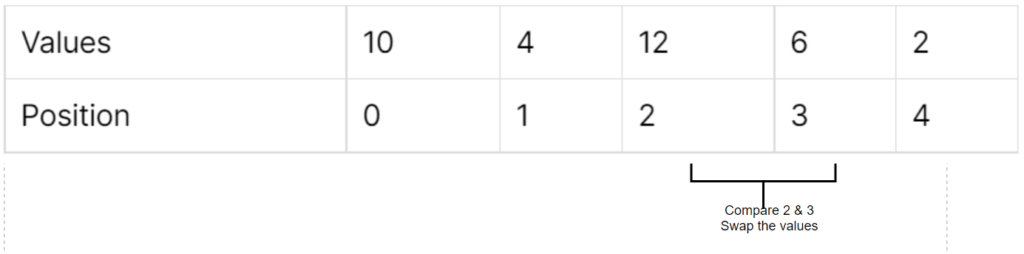
If Second element is greater than third element, then swap the two elements
Step 7
Continue until nth element
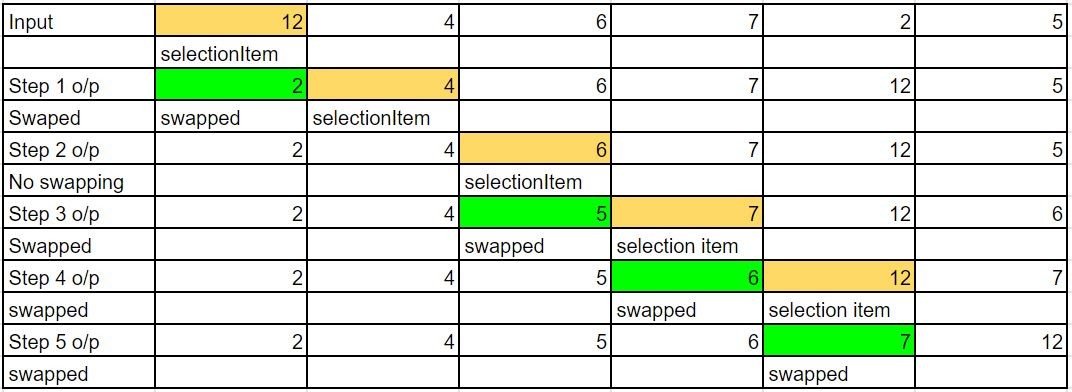
Step 1
Step2Step 3Step 4Result of the first iteration
Java Implementation
public class BubbleSort {

	private void sortArray(int arr[]) {
		for (int i = 0; i < arr.length; i++) {
			boolean isSwap = false;
			for (int j = 0; j < arr.length - i - 1; j++) {
				if (arr[j] > arr[j + 1]) {
					int temp = arr[j + 1];
					arr[j + 1] = arr[j];
					arr[j] = temp;
					isSwap = true;
				}
			}
			if (!isSwap) {
				break;
			}
		}
	}

	public static void main(String[] args) {
		int arr[] = { 10, 12, 4, 6, 2 };
		System.out.println("Array Before sorting");
		for (int i = 0; i < arr.length; i++) {
			System.out.print(arr[i] + "  ");
		}
		BubbleSort bubbleSort = new BubbleSort();
		bubbleSort.sortArray(arr);

		System.out.println("\nArray After Sorting");
		for (int i = 0; i < arr.length; i++) {
			System.out.print(arr[i] + "  ");
		}

	}

}
Output
Array Before sorting
10  12  4  6  2
Array After Sorting
2  4  6  10  12
Binary search algorithm is one of the fastest way to identify the element from an sorted array. It is also the commonly asked data structure interview questions.
It works based on divide and conquer mechanism. It will divide the given array into 2 parts and discard the one part. So it will works faster for a big array compared to linear search.
Time complexity of Binary Search is O(logn)
Below is the give array structure
With the above given array we have to find the position of 9, Using linear search we can find easily, But the time complexity will be O(N)
Below is java code snippet to find the position using Binary Search
public class BinarySearchExample {

	private int binarySearch(int[] array, int target) {
		int leftIndex = 0;
		int rightIndex = array.length - 1;
		while (leftIndex <= rightIndex) {
			// find the middle Index
			int middleIndex = (leftIndex + rightIndex) / 2;
			if (array[middleIndex] == target) {
				return middleIndex;
			}
			if (target > array[middleIndex]) {
				// ignoring the left side of array
				leftIndex = middleIndex + 1;
			} else {
				// ignoring the right side of array
				rightIndex = middleIndex - 1;
			}
		}
		return -1;
	}

	public static void main(String[] args) {
		int[] i = { 2, 3, 5, 6, 7, 9,10 };
		int targetNumber = 9;
		BinarySearchExample object = new BinarySearchExample();
		int output = object.binarySearch(i, targetNumber);
		System.out.println(output);
	}

}
In this post , Let us learn Referential integrity in SQL .
What is Referential integrity ?
Referential integrity in SQL requires that a foreign key must have a matching primary key or it must be null. This constraint is specified between parent and child table.It actually maintains the correspondence between rows in these tables.
What is Primary key ?
The PRIMARY KEY constraint uniquely identifies each record in a table. Primary keys must contain UNIQUE values, and cannot contain NULL values. A table can have only ONE primary key; and in the table, this primary key can consist of single or multiple columns (fields).
program
CREATE TABLE Emp_detail (
    ID int NOT NULL,
    LastName varchar(255) NOT NULL,
    FirstName varchar(255),
    Age int,
    PRIMARY KEY (ID)
);
What is Foreign key?
Foreign key is used to maintain relationship between two tables. Primary of a table act as foreign key in the other table.
program
CREATE TABLE Emp_salary (
	Dep_id int,
    ID int NOT NULL,
	Salary int,
    PRIMARY KEY (Dep_id),
    FOREIGN KEY (ID) REFERENCES Emp_detail(ID)
);
In this way, the referential integrity makes parent table getting co-related with child table .
Rules of Referential integrity
We cant add a record to the table that contains the foreign key unless there is a corresponding record in the linked table.
cascading update and cascading delete are the other new techniques . This ensures that changes made to the linked table gets reflected in the primary table.
Benefits of Referential Integrity
Restricts the entry of duplicate data
Avoids one table from pointing to a nonexistent field in another table
Prevents the deletion of a record that contains a value referred to by a foreign key in another table
Prevents for the addition of a record to a table that contains a foreign key unless there is a primary key in the linked table