Categories
microservices spring-boot

how to create spring boot application

In this tutorial, we will learn how to create spring boot application

What is Spring boot

Spring Boot makes it easy to create stand-alone, production-grade application. It internally use Spring framework and have embedded tomcat servers, nor need to deploy war in any servers

Also easy to create,configure&run

What You Will learn

End of this tutorial, you will learn to create a spring boot application

Annotation
@SpringBootApplication
Dependency
<parent>                                                              
  <groupId>org.springframework.boot</groupId>                         
  <artifactId>spring-boot-starter-parent</artifactId>                 
  <version>2.2.6.RELEASE</version>                                    
  <relativePath /> <!-- lookup parent from repository -->             
</parent>

Time needed: 30 minutes

Steps

  1. Navigate to Spring initializr website

    Click on this url https://start.spring.io/register spring boot micro-services to eureka discovery server

  2. Choose project as Maven

    In this tutorial I am using Maven. You can use gradle or groovy also

  3. Choose language as Java

    Here I am using Java. But we have option for Kotlin & Groovy also

  4. Spring Boot Version

    Please select the stable version, I am using 2.2.6

  5. Enter Group,artifact,Name & description

    Enter the groupid,artifactid&name as you wanted

  6. Packaging as Jar

    Choose Jar, But you have option for war also

  7. Java Verison

    Here I am using java 8

  8. Add Spring Web as dependency

    In case you going you want to expose rest service, Click on the add dependency and select spring web.

  9. Click on the Genreate

    Once you filled all these details click on the Generate Button.
    It will download .rar format

  10. Extract the downloaded file

    Once your download complete, Extract the downloaded .rar file

  11. Import in Eclipse

    After Extracting, Import the project in eclipse

  12. Navigate to Main Class

    Navigate to Main class which will be under src/main/java
    and Make sure the class have @SpringBootApplication annotation

  13. Run

    Right click the class and choose the Run As –> Java Application

  14. Verify logs

    Once your application starts you can see below logs in console

Tomcat started on port(s): 8080 (http) with context path ''
Updating port to 8080
Started StudentApplication in 22.834 seconds (JVM running for 24.503)
Related Articles

create netflix eureka discovery server using spring boot

register spring boot micro-services to eureka discovery

Categories
microservices spring-boot

register spring boot micro-services to eureka discovery
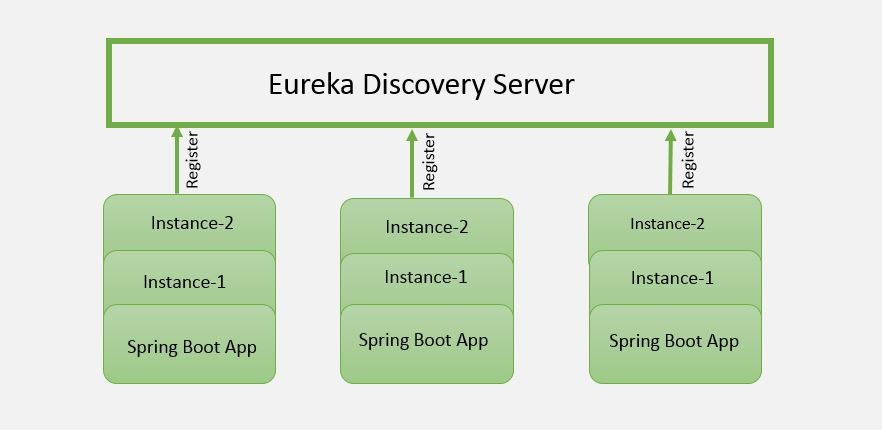
This tutorial is a continuation of our previous tutorial, Here we will learn about register spring boot micro-services to eureka discovery

If you want to learn about eureka please refer my previous post https://beginnersbug.com/create-netflix-eureka-discovery-server-using-spring-boot/

Prerequisite
  • JDK
  • Eclipse
  • Spring boot micro service knowledge
  • Netflix Eureka knowledge
Annotation used to register
@EnableDiscoveryClient
Dependency
<parent>                                                                
  <groupId>org.springframework.boot</groupId>                           
  <artifactId>spring-boot-starter-parent</artifactId>                   
  <version>2.2.6.RELEASE</version>                                      
  <relativePath /> <!-- lookup parent from repository -->               
</parent> 

<dependency>                                                            
  <groupId>org.springframework.cloud</groupId>                          
  <artifactId>spring-cloud-starter-netflix-eureka-client</artifactId>   
</dependency> 

<dependency>                                                            
  <groupId>org.springframework.boot</groupId>                           
  <artifactId>spring-boot-starter-web</artifactId>                      
</dependency>

<dependencyManagement>                                                  
  <dependencies>                                                        
    <dependency>                                                        
      <groupId>org.springframework.cloud</groupId>                      
      <artifactId>spring-cloud-dependencies</artifactId>                
      <version>${spring-cloud.version}</version>                        
      <type>pom</type>                                                  
      <scope>import</scope>                                             
    </dependency>                                                       
  </dependencies>                                                       
</dependencyManagement> 
application.properties
server.port=8080
spring.application.name=student
eureka.client.registerWithEureka=true
eureka.client.fetchRegistry=true
eureka.client.serviceUrl.defaultZone=http://localhost:8761/eureka
Main Class
import org.springframework.boot.SpringApplication;
import org.springframework.boot.autoconfigure.SpringBootApplication;
import org.springframework.cloud.client.discovery.EnableDiscoveryClient;

@SpringBootApplication
@EnableDiscoveryClient
public class StudentApplication {

	public static void main(String[] args) {
		SpringApplication.run(StudentApplication.class, args);
	}
}
Register spring boot

Time needed: 30 minutes

Steps

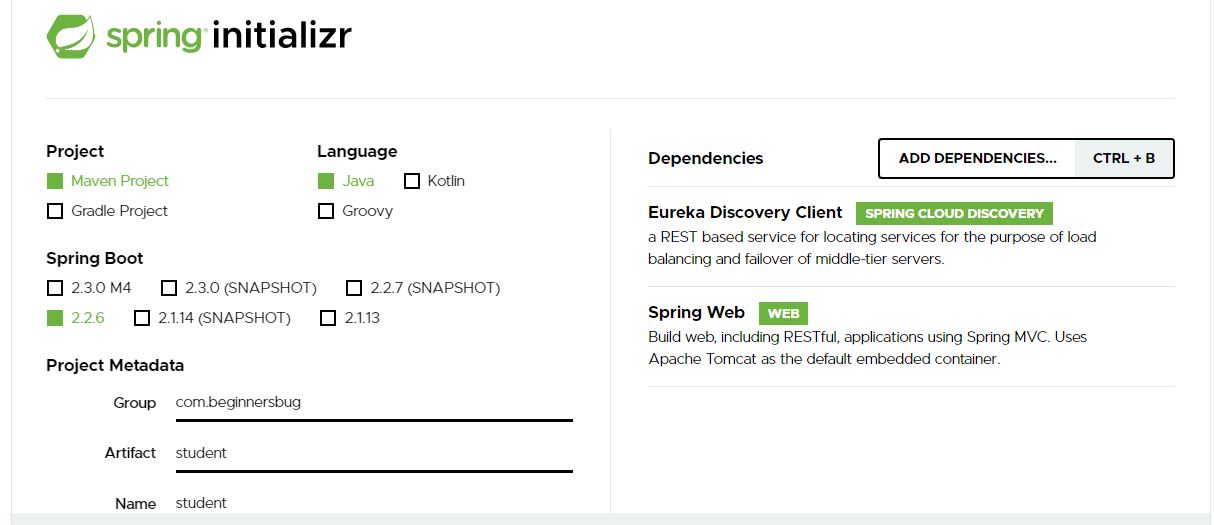
  1. Create a spring boot application

    Use https://start.spring.io/ to create spring boot applicationregister spring boot micro-services to eureka discovery server
  2. Add Dependency

    Add eureka discovery client and spring web dependency in the text box

  3. Click on the generate

    Once you clicked Generate you project will download

  4. Import into your IDE

    Import the downloaded project into your IDE. Here I used eclipse IDE for my development

  5. Add @EnableDiscoveryClient annotation

    Once you imported you project in IDE, Go to the Main class and add @EnableDiscoveryClient annotation.
    This annotation will register spring boot micro-services to eureka discovery
  6. change application.properties

    eureka.client.registerWithEureka=true
    eureka.client.fetchRegistry=true
    eureka.client.serviceUrl.defaultZone=http://localhost:8761/eureka

  7. Build and Run

    Now you can run your application

  8. Testing

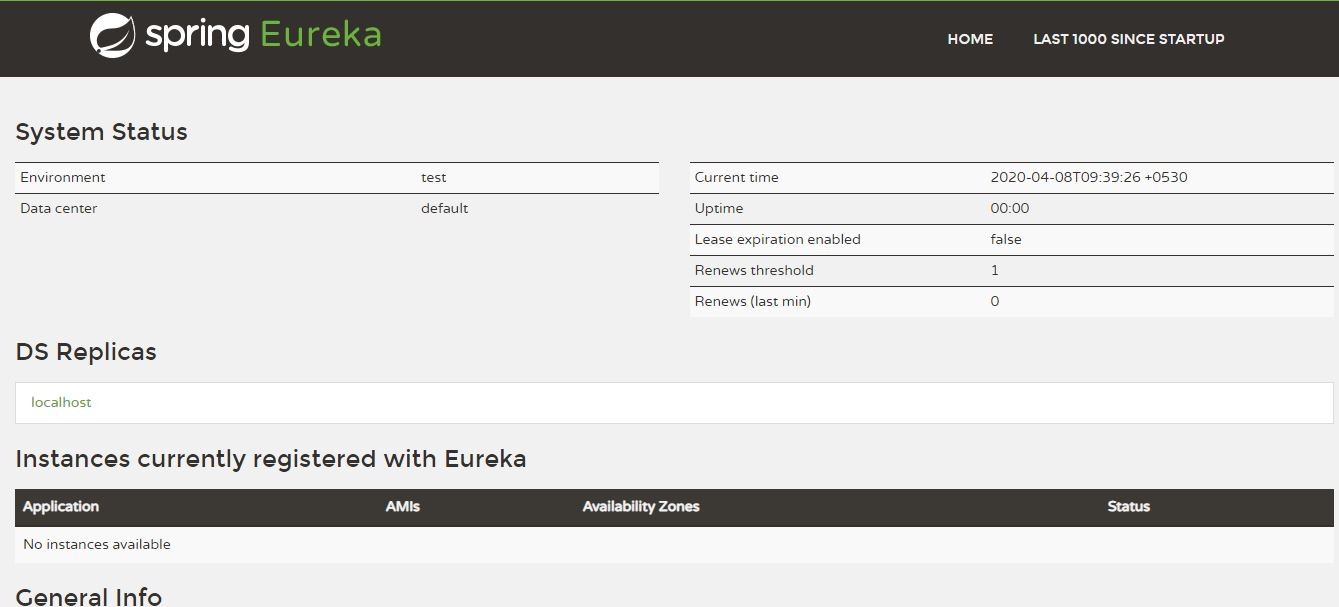
    Open browser and navigate to http://localhost:8761/

  9. You can see your student micro service under Instances

Exception

In case if you didn’t configure the properties properly, you might get below exception.

TransportException: Cannot execute request on any known server
Solution

Confirm below property in your application.properties

eureka<span class="token punctuation">.</span>client<span class="token punctuation">.</span>serviceUrl<span class="token punctuation">.</span>defaultZone<span class="token operator">=</span>http<span class="token operator">:</span><span class="token operator">/</span><span class="token operator">/</span>localhost<span class="token operator">:</span><span class="token number">8761</span><span class="token operator">/</span>eureka

Make sure your discovery server is running on http://localhost:8761

Github

https://github.com/rkumar9090/student

Related Articles

create netflix eureka discovery server using spring boot

Categories
microservices spring-boot

create netflix eureka discovery server using spring boot

Here we are going to create netflix eureka discovery server using spring boot

What is Discovery Server

Discovery server is an application which hold basic information like host name, port about all the micro-services.

What is Eureka

Eureka is the project name of Discovery server which is created by Netflix.

What is the annotation for discovery server
@EnableEurekaServer
Dependency
<parent>                                                             
  <groupId>org.springframework.boot</groupId>                        
  <artifactId>spring-boot-starter-parent</artifactId>                
  <version>2.2.6.RELEASE</version>                                   
  <relativePath /> <!-- lookup parent from repository -->            
</parent>   

<dependency>                                                         
  <groupId>org.springframework.cloud</groupId>                       
  <artifactId>spring-cloud-starter-netflix-eureka-server</artifactId>
</dependency>

<dependencyManagement>                                               
  <dependencies>                                                     
    <dependency>                                                     
      <groupId>org.springframework.cloud</groupId>                   
      <artifactId>spring-cloud-dependencies</artifactId>             
      <version>${spring-cloud.version}</version>                     
      <type>pom</type>                                               
      <scope>import</scope>                                          
    </dependency>                                                    
  </dependencies>                                                    
</dependencyManagement>   
pom.xml

https://github.com/rkumar9090/discovery-server/blob/master/pom.xml

application.properties
server.port=8761
eureka.client.registerWithEureka= false
eureka.client.fetchRegistry= false
Main class
import org.springframework.boot.SpringApplication;
import org.springframework.boot.autoconfigure.SpringBootApplication;
import org.springframework.cloud.netflix.eureka.server.EnableEurekaServer;

@SpringBootApplication
@EnableEurekaServer
public class DiscoveryServerApplication {

	public static void main(String[] args) {
		SpringApplication.run(DiscoveryServerApplication.class, args);
	}
}
How to create Discovery Server

Here we are going to create discovery server with the help of spring boot and with help of some annotation

Time needed: 30 minutes

Steps

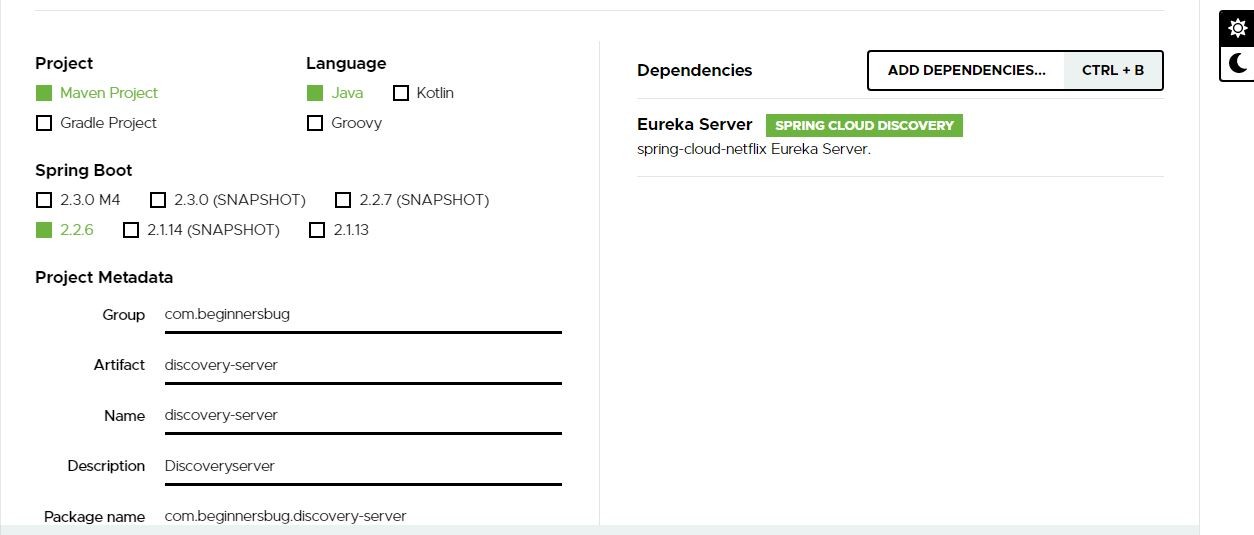
  1. Spring Initializer

    Navigate to https://start.spring.io/create netflix eureka discovery server using spring boot

  2. Add Eureka Server Dependency

    In the dependency text box add eureka server as dependency

  3. Click on Generate

    Once you entered group id, artifact-id& dependency click on Generate

  4. Import the downloaded project in your favorite IDE

    Once you clicked Generate you project will download, after that you can import in your IDE

  5. Add @EnableEurekaServer in the main class

    Once you imported you project in IDE, Go to the Main class and add @EnableEurekaServer annotation

  6. Change application.properties

    Replace your application.properties with below content
    server.port=8761
    eureka.client.registerWithEureka= false
    eureka.client.fetchRegistry= false

  7. Build and Run

    Now you can run your application

  8. Testing

    Open browser and navigate to http://localhost:8761/create netflix eureka discovery server using spring boot

Register Spring boot with Eureka

Refer below article to register spring boot micro services with eureka discovery server
https://beginnersbug.com/register-spring-boot-micro-services-to-eureka-discovery/

Github

https://github.com/rkumar9090/discovery-server

Related Articles

register spring boot micro-services to eureka discovery

Categories
file java

get the last modified date of a file in Java

In this post, we will learn about get the last modified date of a file in Java

It returns the value in long format,

we need to use SimpleDateFormat to convert into date format

Syntax
file.lastModified();
Example

import java.io.File;
import java.text.SimpleDateFormat;

public class LastModifedDate {

	public static void main(String[] args) {
		try {
			File file = new File("C:\\Project.log");
		
			if (file.exists()) {
				long lastModified = file.lastModified();

				SimpleDateFormat sdf = new SimpleDateFormat("MM-dd-yyyy HH:mm:ss");
				System.out.println(sdf.format(lastModified));

			} else {
				System.err.println("File path is not correct ");
			}

		} catch (Exception e) {
			e.printStackTrace();
		}
	}
}
Github

https://github.com/rkumar9090/BeginnersBug/blob/master/BegineersBug/src/com/geeks/example/files/LastModifedDate.java

Related Articles

how to read a file from java with example

Categories
Interview java String

count number of words in string using java

In this post, we will learn about count number of words in string using java

In below example we using split method to count number of words in a sentence.

If String have more than one space consecutively, then we need to replace with one string using below code

sentence.replaceAll("\\s+", " ").trim();
Syntax
properString.split(" ");
Example using split
public class CountWords {

	public static void main(String[] args) {

		try {
			String sentence = "    The pen    is mightier than the sword . ";
			String properString = sentence.replaceAll("\\s+", " ").trim();
			String[] split = properString.split(" ");
			System.out.println("The sentence have " + split.length + " words");

		} catch (Exception e) {
			e.printStackTrace();
		}
	}
}
Output
The sentence have 8 words
Example using StringTokenizer
import java.util.StringTokenizer;

public class CountWords {

	public static void main(String[] args) {
		try {
			String sentence = "    The pen    is mightier than the sword . ";
			StringTokenizer tokens = new StringTokenizer(sentence);
			System.out.println("The sentence have " + tokens.countTokens() + " words");

		} catch (Exception e) {
			e.printStackTrace();
		}
	}
}
Output
The sentence have 8 words
Github

https://github.com/rkumar9090/BeginnersBug/blob/master/BegineersBug/src/com/geeks/example/strings/CountWordsUsingSplit.java

https://github.com/rkumar9090/BeginnersBug/blob/master/BegineersBug/src/com/geeks/example/strings/CountWordsUsingTokenzier.java

Related Articles

find the first occurrence of a character in string using java

Categories
java String

find the first occurrence of a character in string using java

In this post, we will learn to find the first occurrence of a character in string using java

As like in above image we are going to take String “BeginnersBug” for our example.

This array starts from 0 index to 11.

In this example, we are going to find the first occurrence of character ‘e’. which is 1

Note: that indexOf is case sensitive. It will return -1 if the character is not found

Syntax
	int indexOf = s.indexOf('e');
Example
public class FirstOccurance {

	public static void main(String[] args) {
		try {
			String s = "BeginnersBug";
			int indexOf = s.indexOf('e');
			System.out.println("The first occurance of e is " + indexOf);
		} catch (Exception e) {
			e.printStackTrace();
		}

	}
}
Example
The first occurance of e is 1
Github

https://github.com/rkumar9090/BeginnersBug/blob/master/BegineersBug/src/com/geeks/example/strings/FirstOccurance.java

Related Articles

find the last index of a character in string using java

Categories
java String

find the last index of a character in string using java

In this post, we will learn to find the last index of a character in string using java

As like in above image we are going to take String “BeginnersBug” for our example.

This array starts from 0 index to 11.

In this example, we are going to find the last occurrence of character ‘B’. which is 9

Note: that lastIndexOf is case sensitive. It will return -1 if the character is not found

Syntax
s.lastIndexOf('B');
Example
public class LastIndex {

	public static void main(String[] args) {
		try {
			String s = "BeginnersBug";
			int indexOf = s.lastIndexOf('B');
			System.out.println("The last index of B is " + indexOf);

		} catch (Exception e) {
			e.printStackTrace();
		}

	}
}
Output
The last index of B is 9
Github

https://github.com/rkumar9090/BeginnersBug/blob/master/BegineersBug/src/com/geeks/example/strings/LastIndex.java

Related Articles

find the first occurrence of a character in string using java

Convert String to lowercase using java

Categories
java properties

how to write properties file in java

In this tutorial, we will learn how to write properties file in java

we are going to use FileOutputStream to write in file. It is going to write on classpath

Syntax
properties.store(new FileOutputStream("database.properties"), "Comments: Updated from java");
Example Create new property file
import java.io.FileOutputStream;
import java.util.Properties;

public class WriteProperties {

	public static void main(String[] args) {
		try {

			Properties properties = new Properties();
			properties.setProperty("database.url", "jdbc:mysql://localhost:3306/beginnersbug");
			properties.setProperty("database.username", "root");
			properties.setProperty("database.password", "password");
			properties.store(new FileOutputStream("database.properties"), "Comments: Updated from java");
			System.out.println("File has writen successfully");
		} catch (Exception e) {
			e.printStackTrace();
		}

	}

}
Output
File has writen successfully
Github

https://github.com/rkumar9090/BeginnersBug/blob/master/BegineersBug/src/com/geeks/example/WriteProperties.java

Related Articles

how to load property file in java


Categories
java

java.sql.SQLTimeoutException Query Timeout

In this tutorial, we will learn about java.sql.SQLTimeoutException Query Timeout

It is always good to do proactive coding. As part of database connection configuration we need to take care of certain parameters

Timeout is one of those properties. If don’t configured well you might get below exception

java.sql.SQLTimeoutException The Query has Timed Out
Root Cause for query timeout

Your application runs a long query with database. you will have this exception.

Solution
  • setQueryTimeout
    • Sets the number of seconds the driver will wait for a Statement object to execute to the given number of seconds.
    • default value is 0. which means infinite
  • setSelectMethod cursor
    • By setting the property to “cursor,”. you can create a server-side cursor that can fetch smaller chunks of data at a time
    • default value is direct.
  • setSendStringParametersAsUnicode false 
    • Set to false string parameters are sent to the server in an ASCII/MBCS format, not in UNICODE
    • default value is true
Reference

https://github.com/Microsoft/mssql-jdbc/issues/634

Categories
java properties

how to load property file in java

In this post, we will learn how to load property file in java. Properties file is used to store and retrieve values from file.

It is stored as key and value pair. Below is an sample property file

database.properties
database.url=jdbc:mysql://localhost:3306/beginnersbug
database.username=root
database.password=password
Read properties from absolute path
import java.io.FileReader;
import java.util.Properties;

public class LoadProperty {

	public static void main(String[] args) {
		try {
			FileReader reader = new FileReader("D:\\BB\\Workspace\\database.properties");

			Properties p = new Properties();
			p.load(reader);

			System.out.println(p.getProperty("database.url"));
			System.out.println(p.getProperty("database.username"));
			System.out.println(p.getProperty("database.password"));

		} catch (Exception e) {
			e.printStackTrace();
		}

	}

}
Output
jdbc:mysql://localhost:3306/beginnersbug
root
password
Read properties from class path

Please make sure you have database.properties in class path. else you will get Please check the file present in classpath

Syntax
LoadPropertyFromClassPath.class.getResourceAsStream("database.properties");

import java.io.InputStream;
import java.util.Properties;

public class LoadPropertyFromClassPath {

	public static void main(String[] args) {
		try {
			Properties prop = new Properties();
			InputStream stream = LoadPropertyFromClassPath.class.getResourceAsStream("database.properties");
			if (stream != null) {
				prop.load(stream);
				System.out.println(prop.getProperty("database.url"));
				System.out.println(prop.getProperty("database.username"));
				System.out.println(prop.getProperty("database.password"));
			} else {
				System.err.println("Please check the file present in classpath");
			}

		} catch (Exception e) {
			e.printStackTrace();
		}

	}

}
Output
jdbc:mysql://localhost:3306/beginnersbug
root
password
Print all the values from property file
Syntax
prop.keySet().stream().map(key -> key + ": " + prop.getProperty(key.toString()))
						.forEach(System.out::println);
Example
import java.io.InputStream;
import java.util.Properties;

public class PrintPropertis {

	public static void main(String[] args) {
		try {
			Properties prop = new Properties();
			InputStream stream = LoadPropertyFromClassPath.class.getResourceAsStream("database.properties");
			if (stream != null) {
				prop.load(stream);
				prop.keySet().stream().map(key -> key + ": " + prop.getProperty(key.toString()))
						.forEach(System.out::println);
			} else {
				System.err.println("Please check the file present in classpath");
			}

		} catch (Exception e) {
			e.printStackTrace();
		}
	}

}
Output
database.password: password
database.url: jdbc:mysql://localhost:3306/beginnersbug
database.username: root
Github

https://github.com/rkumar9090/BeginnersBug/blob/master/BegineersBug/src/com/geeks/example/LoadProperty.java

https://github.com/rkumar9090/BeginnersBug/blob/master/BegineersBug/src/com/geeks/example/LoadPropertyFromClassPath.java

https://github.com/rkumar9090/BeginnersBug/blob/master/BegineersBug/src/com/geeks/example/PrintPropertis.java

Related Articles

how to read a file from java with example

delete a file from java code